Newly hatched axolotl larvae measure about 10 to 13 mm, carry no legs, and live off a yolk sac for the first day or two. After that they must eat live, moving food or they starve. Raising them means daily live feeding, near-daily water changes, and constant size-sorting to stop cannibalism, all the way to rehoming size.
What happens in the first 48 hours after axolotl larvae hatch?
A freshly hatched larva is a translucent comma about 10 to 13 mm long with feathery external gills and no legs at all. For the first 24 to 48 hours it lives on the yolk still in its belly and does not need feeding. Once that yolk is gone, the clock starts, and it must find live food fast.
At hatching the larva has visible external gill filaments, a long tail for swimming, and tiny dark eyes, but its limbs have not yet budded. The yolk reserve buys you a short grace period, and how long it lasts depends on temperature. Warmer water burns the yolk faster, so at the cooler end the reserve can stretch toward 72 hours, while in warmer tubs it may be spent inside a day. The Ambystoma Genetic Stock Center starts feeding larvae as soon as the yolk is no longer visible in their bellies (source: Ambystoma Genetic Stock Center), which is the cue to watch for rather than a fixed hour count.
Set up a simple first home before the eggs finish hatching. A shallow container works best, because tiny larvae feed poorly in deep water and need to find food by bumping into it.
- A shallow glass or plastic bowl, roughly 20 cm across, holding water 5 to 10 cm deep.
- Up to about 50 newly hatched larvae per bowl while they are all under 20 mm and similar in size.
- No filter and no substrate at this stage, since current stresses them and gravel traps food and waste.
- A stable spot out of direct light, with water held in the cool range covered below.
The axolotl egg care guide covers the stage just before this, handling the clutch through to hatching, and the wider axolotl care guide sets the husbandry framework these rearing notes sit inside.
What do axolotl larvae eat as a first food?
Axolotl larvae eat only live, moving prey for their first few weeks. Their first food is almost always newly hatched brine shrimp, the orange nauplii of Artemia, with live daphnia or microworms as alternatives. A larva under about 20 mm detects prey by movement alone, so dead, frozen, or prepared food is ignored and left to rot.
This single fact drives the whole early feeding plan. Newly hatched brine shrimp are the standard first food because they are tiny, they wriggle, and they are easy to hatch on demand. Live daphnia and the smaller Moina are an excellent option too, and have one real advantage: daphnia survive in fresh water, so any the larvae miss keep swimming instead of dying and fouling the bowl (source: axolotl.org rearing guide). Brine shrimp, by contrast, die within hours in fresh water, so uneaten shrimp must be siphoned out the same day. Microworms work as a backup but are less ideal as a sole starter.
I have watched a first-time breeder lose half a bowl of larvae in a week, not to disease but to a sprinkle of frozen bloodworm that the larvae could not even register, because nothing in the bowl was moving. If you raise nothing else from this guide, raise this: for the first two to three weeks, live and moving is not a preference, it is the only thing that works. The live food safety guide covers sourcing and culturing these foods without importing parasites, and what axolotls eat covers the wider diet they grow into.
Hatching your own brine shrimp is cheap and keeps a fresh supply on hand. The worked recipe below is the standard hobby method.
| Step | What to do | Target |
|---|---|---|
| Mix the brine | Dissolve aquarium or non-iodized salt in dechlorinated water | About 25 g salt per litre, near seawater strength |
| Add cysts and air | Pour in brine shrimp cysts, run a steady airline with no airstone | Cysts kept tumbling, not settled |
| Hold warm with light | Keep the jar warm under a lamp | 26 to 28 degrees C speeds the hatch |
| Wait for the hatch | Most cysts hatch in 18 to 24 hours at that temperature | Orange nauplii swarm toward a light |
| Harvest and rinse | Turn off air, let shells settle, siphon the orange layer, rinse in fresh water | Feed within a day for best nutrition |
Those hatching figures, salt near 25 g per litre and a hatch in 18 to 24 hours at 26 to 28 degrees C, are the conditions hatcheries publish for reliable results (source: Brine Shrimp Direct). Rinse the nauplii before feeding so you are not adding salt to the larvae’s fresh water.
How often should you feed axolotl larvae?
Feed the smallest larvae two to three times a day, every day, dropping to once or twice daily as they grow past about 20 mm. The target is simple to read: a well-fed larva has a visibly full, rounded belly. The Ambystoma colony aims for every young larva showing an orange belly after a feed, with few shrimp left swimming uneaten.
Larvae grow fast and have almost no reserves, so frequency matters more than portion size. Underfeeding shows up as flat bellies, stalled growth, and a sharp rise in cannibalism, because hungry larvae turn on each other. Overfeeding is wasteful but mostly a water-quality problem rather than a direct harm, since uneaten brine shrimp die and foul the water. The aim across the larval period is steady, full bellies without a layer of dead food on the bottom. The frequency-by-size table below tracks how feeding eases off as the larvae mature.
| Larva size | Rough age | Feeding frequency | Typical foods |
|---|---|---|---|
| 10 to 20 mm | Hatch to ~2 weeks | 2 to 3 times daily | Live baby brine shrimp, small daphnia, microworms |
| 20 to 40 mm | ~2 to 4 weeks | 1 to 2 times daily | Adult daphnia, chopped bloodworm, continued brine shrimp |
| 40 to 75 mm | ~4 to 8 weeks | Once daily | Chopped blackworm, small earthworm pieces, soft pellets |
The orange-belly standard comes straight from the laboratory protocol, which feeds enough brine shrimp that every larva colors up but few shrimp escape uneaten (per Ambystoma Genetic Stock Center). That balance is the practical sweet spot: enough food that none go hungry, not so much that the water turns. As the larvae cross into the juvenile range the schedule settles toward adult feeding, which the feeding schedule by age guide carries forward.
How do you manage water quality for axolotl larvae?
Larvae live in small unfiltered containers, so you control water quality by changing water, not by cycling a filter. Plan on a full water change daily for cups and bowls, and roughly half daily for small tubs. Keep ammonia and nitrite at zero, and hold the temperature cool, around 16 to 20 degrees C, for the best balance of growth and safety.
Frequent changes are not optional here, because a bowl of larvae has no biological filter to break down waste. The Ambystoma protocol changes the water before feeding and again within 24 hours after, since uneaten brine shrimp break down quickly and spoil the water (per Ambystoma Genetic Stock Center). Move larvae gently with a wide pipette or by pouring, never a net, which shreds gills. Clean emptied containers with a baking-soda and salt mix in a 2:1 ratio, then rinse well before reuse (per Ambystoma Genetic Stock Center). Always refill with temperature-matched, dechlorinated water, which the dechlorinator guide covers in detail. The table below sets the water routine by rearing stage.
| Rearing stage | Container | Water change | Filter |
|---|---|---|---|
| Stage 1 (cups, bowls) | Deli cups or shallow bowls | 100% daily, before feeding | None, current stresses tiny larvae |
| Stage 2 (small tubs) | 5 to 10 litre tubs | About 50% daily, siphon the bottom | Optional gentle sponge with pre-filter |
| Stage 3 (grow-out) | Cycled 20 to 40 litre tank | 20 to 30% every 2 to 3 days | Cycled sponge filter |
Temperature sets the pace of everything else. Larvae do well in the cool range, and most rearing guidance keeps them between about 15 and 20 degrees C, never letting them sit above 22 degrees C, where stress and bacterial infection rise (source: LafeberVet). Cooler water slows growth but is forgiving on water quality, while warmer water speeds growth and waste alike. The temperature guide and the water parameters guide cover the targets in full, and the water change schedule guide carries the routine into the adult tank.
Why do axolotl larvae eat each other, and how do you stop it?
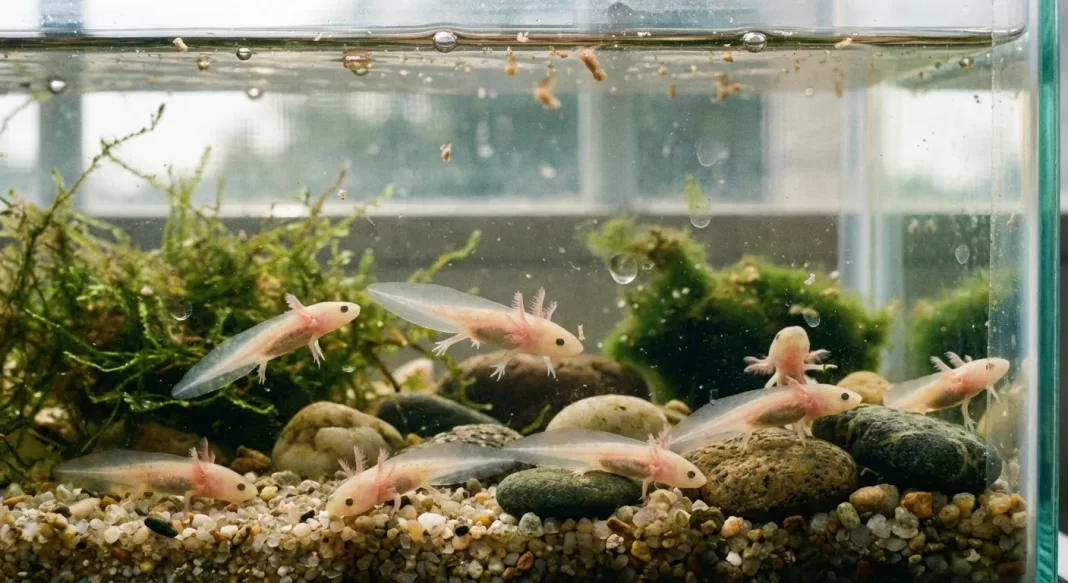
Axolotl larvae are naturally cannibalistic, and the only reliable way to stop it is sorting them by size. Larvae detect movement and bite at it, so a wriggling sibling reads as food. The damage starts as missing toes and chewed gills and can end with a larger larva swallowing a smaller one whole. Size-matched groups and full bellies cut the losses sharply.
Cannibalism is the leading cause of larval death, ahead of poor water quality, and it is almost entirely preventable. Size variation opens within the first week, and by two weeks the largest larvae can be twice the length of the smallest, which is exactly when the biting turns serious. From a keeper’s perspective, the first clutch teaches this the hard way: you look in on a bowl that was fine yesterday and find three larvae missing toes and one with a stub where a gill stalk used to be. Mixed-size groups reliably end up short of toes and feet (per axolotl.org rearing guide). Wild-type larvae also tend to attack non-wild-type tankmates more than their own kind, so a mixed-color cohort needs closer watching.
You cannot eliminate cannibalism, only manage it down, and three levers do most of the work. Sort by size every one to two weeks starting around day 10 to 14, using a cup or pipette rather than a net. Keep everyone well fed, since hunger sharply raises aggression. Reduce visual contact with heavy planting, real or plastic, and lowered light so larvae notice each other less. When a larva loses toes or a limb tip, isolate it in a clean cup to heal, because repeated injury invites infection. Lost toes, limb tips, and gill filaments do regenerate in a clean, well-fed larva, often within a few weeks, which the injury and regeneration guide covers. This article gives the working summary; the dedicated axolotl cannibalism prevention guide covers the full sorting protocol and stocking math for a large clutch.
When larvae start dying despite your routine, work the causes in order of likelihood. The triage rule below ranks them.
| Sign | Most likely cause | First action |
|---|---|---|
| Missing toes, chewed gills, larvae vanishing | Cannibalism | Sort by size now, isolate injured larvae |
| Flat bellies, stalled growth, listless larvae | Starvation or wrong food | Confirm food is live and moving, feed more often |
| Cloudy water, film, sudden multi-larva death | Water quality crash | Full water change, cut feeding, check temperature |
| Deformed bodies, kinked tails from hatch | Unseen genetic problems | Cull humanely, do not breed the line again |
If larvae keep dying after you correct food, water, and sorting, an infection may be in play, and you should consult an exotic-animal veterinarian. The genetics behind those hatch deformities sit in the line-breeding risks guide, and the original pairing decisions live in the axolotl breeding guide.
How do you scale containers as your larvae grow?
You raise larvae through three container stages, moving up as they grow. Start in tiny cups or shallow bowls, graduate to small tubs around 25 mm, then to a cycled grow-out tank once they pass 50 mm. Each step adds water volume and reduces density, because bigger larvae need more room and produce more waste.
The progression matches container size to the larvae’s needs at each phase. Early on, shallow and small is better, since tiny larvae find food by contact and a large tank simply hides their prey. As they grow, density has to fall to keep cannibalism and waste under control. The stage table below ties size to container, water volume per animal, and density.
| Stage | Larva size | Container | Water per animal | Density guide |
|---|---|---|---|---|
| 1 | 10 to 25 mm | Deli cups, shallow bowls | 200 to 500 ml | Up to ~50 per bowl while under 20 mm |
| 2 | 25 to 50 mm | Small tubs, 5 to 10 litres | 0.5 to 1 litre | No more than ~25 per tub |
| 3 | 50 mm and up | Cycled grow-out tank | Standard juvenile stocking | Under 10 per container, or solo |
The density figures come straight from rearing practice. At 25 mm, keep no more than about 25 larvae in a tub of roughly 45 by 20 by 25 cm, and once they pass 40 mm, keep fewer than ten together (per axolotl.org rearing guide). Past 50 mm many breeders move the larger animals into individual small bowls of about a litre each, because by then a single aggressive juvenile can maim a tankmate overnight. Stage 2 can take a gentle sponge filter if you fit a pre-filter cover so larvae are not pulled in, and Stage 3 runs a properly cycled sponge filter so the tank can carry its own waste. Sorting siblings by size here also sets up the later job of telling them apart by sex, which the gendering and separation guide covers.
What is the leg-development and growth timeline from hatch to juvenile?
Axolotl larvae grow legs in a fixed order: front legs first, around two weeks and 18 to 25 mm, then rear legs a week or two later. They reach about 25 mm in two to three weeks, then gain roughly an inch a month. By 50 mm, near two inches, all four legs work and the animal is functionally a juvenile.
The sequence is predictable enough to use as a calendar, though the exact timing shifts with temperature and feeding. Front legs begin to bud once larvae reach about 20 mm, within roughly nine days at 22 degrees C, appearing as small nubs behind the gill stalks (per axolotl.org rearing guide). Rear legs follow more slowly, budding at the tail base around three to four weeks. Color morph becomes clearly readable around 36 mm, so a leucistic or albino larva that looked like all the others starts to declare itself. The timeline table below maps size and age to what you should see.
| Age | Rough size | What develops | Feeding shift |
|---|---|---|---|
| Week 1 | 13 to 18 mm | Translucent body, branching gills, no limb buds | Live brine shrimp or daphnia, 2 to 3x daily |
| Week 2 | 18 to 25 mm | Front legs bud and gain visible toes | Begin adult daphnia, chopped bloodworm |
| Weeks 3 to 4 | 25 to 40 mm | Rear legs bud at tail base, color shows ~36 mm | Chopped blackworm, small bloodworm |
| Weeks 5 to 8 | 40 to 75 mm | Rear legs finish, all four limbs walk | Soft pellets, chopped earthworm, blackworm |
Growth pace is steady rather than dramatic. At about 20 degrees C with good feeding, a larva should reach roughly 1.5 cm within its first week and around an inch by one and a half to two months old (per Ambystoma Genetic Stock Center). After that, expect close to an inch a month, slowing as the animal nears adult size. Tracking that curve into the juvenile and adult range is the job of the size and growth guide.
When and how do you transition larvae to larger foods?
Move larvae onto bigger foods in step with their size and legs, never all at once. Around 25 mm, when front legs and a sense of smell arrive, you can start adding thawed bloodworm. By 40 mm they take chopped blackworm, and by 50 mm and up they accept soft pellets and chopped earthworm. Always change foods gradually so they do not refuse the new item.
The trigger is the front legs, which roughly coincide with the larva starting to smell food rather than only seeing it move. That is the moment dead and frozen foods become possible. The food-transition table below ties each new food to the size that allows it.
| Larva size | New food allowed | Notes |
|---|---|---|
| Under 20 mm | Live brine shrimp, daphnia, microworms | Movement only, nothing dead is taken |
| ~25 mm (front legs) | Thawed frozen bloodworm | First non-live food, offer alongside live |
| 25 to 40 mm | Chopped blackworm, adult daphnia | Blackworms live in fresh water and graze all day |
| 50 mm and up | Soft pellets, chopped earthworm | True juvenile diet begins |
Laboratories tend to introduce soft-moist salmon pellets, around 3 mm across, once larvae reach about 4 cm, then phase brine shrimp out entirely by the time the animals are 5 to 8 cm long (per Ambystoma Genetic Stock Center). Pellet acceptance is uneven, and some juveniles need several days of repeated offering before they take the new food, so keep live food going until each animal is reliably eating pellets or worms. Change one food at a time and overlap the old and new for several days, because an abrupt switch often means a hunger strike. The worms versus pellets guide details the staple options the juveniles graduate into.
When are axolotl larvae ready for rehoming, and what about surplus?
Axolotl larvae are ready for rehoming once they reach about 3 to 4 inches, roughly 7.5 to 10 cm, and reliably eat non-live food. At that size they are past the most fragile stage, accept earthworms and pellets, tolerate normal tank filtration, and ship safely. Below that size, they still need live food cultures and daily care most new buyers are not set up for.
Selling larvae too small sets the buyer up to fail, because an animal under three inches still demands live brine shrimp or daphnia, frequent water changes in tiny containers, and constant size-sorting. From a breeder-intake perspective, the surplus problem is the one new breeders most often skip: a single clutch can yield several hundred viable larvae, and homes have to be lined up before the eggs hatch, not after the tubs overflow. The go/no-go checklist below sets the bar for a rehoming-ready juvenile.
| Gate | Ready | Not ready |
|---|---|---|
| Size | 3 to 4 inches (7.5 to 10 cm) | Under 3 inches, still on live food |
| Diet | Eats pellets, earthworm, or blackworm | Takes only live brine shrimp or daphnia |
| Body | Four intact limbs, no open wounds | Missing limbs, fresh bite injuries |
| Gills | Full, fluffy filaments | Ragged or deteriorating gills |
A clutch of 500 eggs might give several hundred viable larvae, each needing its own container, daily water changes, and a constant live-food supply through the larval weeks. Because few keepers can carry that load to the end, most hobbyist breeders keep the healthiest 30 to 50 and humanely cull the rest early, and axolotl.org’s own rearing advice is to cull most of a first clutch so the remainder get full attention (per axolotl.org rearing guide). Culling clearly deformed or weak larvae early is a welfare decision, since it spares animals a poor life and keeps compromised stock out of the trade. When you are unsure whether a struggling larva is treatable or should be culled, consult an exotic-animal veterinarian. Sorting which juveniles to keep for grow-out applies the same selection eye covered in the healthy-axolotl selection guide.
Frequently asked questions
Can I raise axolotl larvae without any live food?
Not for the first few weeks. A larva under about 20 mm detects prey by movement alone and will ignore dead, frozen, or prepared food until its front legs and sense of smell develop near 25 mm. Newly hatched brine shrimp or live daphnia are the only practical first foods. From around 25 mm you can begin offering thawed bloodworm, but live food stays the more reliable choice until at least 40 mm. Planning a clutch without a live-food source set up in advance usually ends in starvation.
How many larvae should I keep from a large clutch?
Keep only as many as you can house, feed, and rehome responsibly, which for most hobbyists is far fewer than hatch. A 500-egg clutch can produce several hundred viable larvae, and each needs its own small container, daily water changes, and live food through the larval weeks. That quickly means dozens of containers and hours of daily work. Most breeders select the healthiest 30 to 50 and cull the rest early, since the alternative is overcrowding that drives cannibalism and disease.
Do axolotl larvae need a filter?
Not at first. Newly hatched larvae in cups or shallow bowls do best with no filter at all, since even a gentle current stresses them, and daily full water changes keep the water clean instead. Once larvae pass about 25 mm and move into tubs, a sponge filter fitted with a pre-filter cover can supplement water changes without trapping them. By the grow-out stage around 50 mm, a properly cycled sponge filter handles the nitrogen cycle and lets you change water less often.
Will toes, limbs, and gills lost to cannibalism grow back?
Yes. Regeneration is one of the axolotl’s defining traits, and larvae regrow lost toes, limb tips, and gill filaments, often within a few weeks if they are well fed in clean water. The catch is that repeated injuries slow recovery, invite infection, and stress the animal, so the answer is not to rely on regeneration but to prevent the biting through size-sorting. Isolating an injured larva in a clean container is the fastest path back to whole, and a wound that worsens warrants an exotic-animal vet.
What water temperature is best for raising axolotl larvae?
Keep larvae cool, in the range of about 16 to 20 degrees C (60 to 68 F), and never let the water sit above 22 degrees C. The cooler end is forgiving on water quality and lowers infection risk, while the warmer end speeds growth but also speeds waste and bacterial problems. Many keepers aim near 18 degrees C as a balance of steady growth and stable water. Stable temperature matters as much as the exact number, so avoid swings and direct light or heat on the containers.
How big should an axolotl be before I rehome or sell it?
Wait until roughly 3 to 4 inches, about 7.5 to 10 cm, and eating non-live food reliably. At that size the juvenile has cleared the fragile larval stage, accepts earthworm pieces and pellets, tolerates standard tank filtration, and can ship safely in an insulated container. A smaller animal still needs live cultures and daily water changes that most first-time buyers cannot provide, so selling early usually means the animal arrives stressed or dies soon after.
Related guides
- Axolotl egg care guide: handling the clutch through hatching
- Axolotl cannibalism prevention: the full sorting protocol for a clutch
- Axolotl breeding guide: how to run a pairing and manage a clutch
- Axolotl care guide: complete husbandry hub for new keepers
- Axolotl size and growth guide: tracking juveniles to adult size
- Axolotl feeding schedule by age: live food to adult diet
By the ExoPetGuides editorial team (AI-assisted drafting; human-reviewed), reviewed by an exotic-animal veterinarian
Updated 2026-06-03
Primary sources: axolotl.org rearing guide, Ambystoma Genetic Stock Center (University of Kentucky), Brine Shrimp Direct hatching guide, LafeberVet
Disclaimer: This content is for educational purposes only and is not a substitute for professional veterinary advice. Always consult a qualified veterinarian, ideally an exotic-animal specialist, for any health concern about your pet. Care recommendations may vary based on species, individual animal, and local regulations.