A bioactive enclosure is a functional ecosystem: the substrate, microorganisms, clean-up crew (CUC), and plants work together to process waste, maintain soil health, and provide a naturalistic environment for the animal. In a well-established bioactive, faeces break down in the substrate within days, plants grow and are periodically browsed, and CUC organisms aerate the soil and prevent bacterial blooms. The deep-clean cycle that defines standard maintenance largely disappears.
The trade-off is real. Bioactive requires a higher initial investment in materials and a 2–4 week establishment period before the dragon can be introduced. The substrate must be prepared correctly, the CUC must be the right species for an arid enclosure, and the plants must be able to tolerate the heat and low humidity of a bearded dragon setup. This guide covers each component step by step.
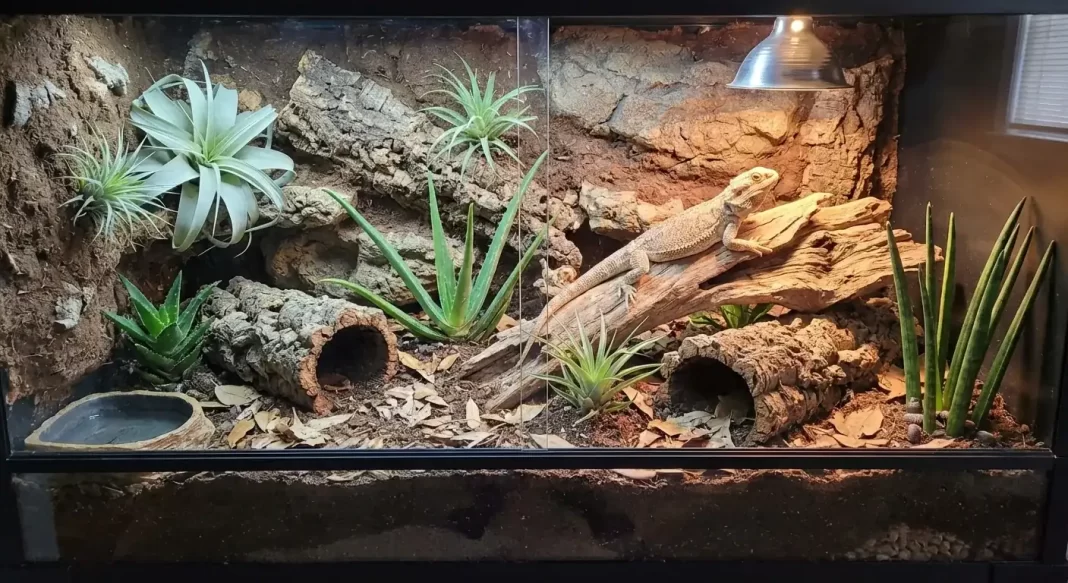
Quick Answer — Bearded Dragon Bioactive Setup
A bearded dragon bioactive setup requires at least 6 inches of substrate (60:40 topsoil/playsand or commercial Terra Sahara), arid-tolerant isopods and springtails (powder blue or powder orange) as the clean-up crew, and drought-tolerant safe plants under a 6500K grow light. Allow 2–4 weeks for the system to establish before introducing the dragon. Not suitable for dragons under 6 months old.
Is Bioactive Right for You?
Bioactive setups are the best enrichment environment available for a captive bearded dragon — they enable natural digging, foraging, and burrowing behaviours in ways that no standard setup can replicate. ReptiFiles’ enrichment research notes that animals with enriched environments show lower stress indicators and more natural activity patterns. The practical benefits are real too: reduced cleaning frequency, natural soil odour management, and an enclosure that improves aesthetically over time as plants grow.
The honest caveats:
Higher setup cost: Quality bioactive substrate, CUC cultures, and live plants add £100–£250 / $130–$330 to the setup budget compared to a tile-and-hide approach.
Not beginner-appropriate: Bioactive adds a layer of complexity that can obscure problems. A new keeper should establish correct temperatures, UVB, and feeding before adding a living substrate ecosystem to manage.
Not suitable for young dragons: Dragons under 6 months may accidentally ingest CUC organisms while learning prey discrimination. Wait until the dragon is reliably feeding and behaviourally confident before moving to bioactive.
If you’re still setting up the fundamentals, start with a standard setup and consider the bioactive upgrade at 6–12 months. The bearded dragon tank setup guide covers the standard approach.
What You Need — Component List
Before starting, gather:
| Component | Specifics |
|---|---|
| Enclosure | 4x2x2 ft minimum; 6x2x2 preferred for plant establishment |
| Substrate | BioDude Terra Sahara or 60:40 topsoil/playsand; minimum 6” depth |
| CUC | Powder blue isopods + arid springtails (minimum) |
| Leaf litter | Oak, magnolia, or commercial biodegradable mix |
| Sphagnum moss | Optional; improves lower-layer moisture retention |
| Live plants | Drought-tolerant, pesticide-free, safe species |
| Grow light | 6500K LED (Arcadia Jungle Dawn or equivalent) |
| Standard heating | Halogen basking cluster + UVB tube as per normal setup |
| Cork bark | Basking platform + cool-side hide |
| Hardscape | Flagstone, driftwood |
Step 1 — Substrate: The Foundation
Depth
A minimum of 6 inches / 15cm of substrate is required. This depth enables:
– Adequate root space for live plants
– Burrowing depth for the dragon (a natural thermoregulation behaviour)
– A moisture gradient with distinct dry and moist layers
– CUC habitat across multiple substrate levels
For a 4×2 base area (8 square feet), 6” of substrate requires approximately 150 litres of material. For a 6×2 (12 square feet), approximately 225 litres.
Substrate Options
Option A — Commercial (recommended for first bioactive): BioDude Terra Sahara is the industry standard. It’s formulated with the correct particle sizes, drainage characteristics, and beneficial microorganism baseline for arid desert species. If you’re in the UK/EU, Arcadia EarthMix Arid is the closest equivalent.
Option B — DIY Mix:
– 60% quality topsoil (no added fertilisers, no perlite, no moisture crystals)
– 40% children’s playsand (not builder’s sand; not beach sand)
– Mix thoroughly before introducing any moisture
What not to use:
| Material | Why to Avoid |
|---|---|
| Pure sand | No structure; no CUC habitat; impaction risk; roots can’t establish |
| Coconut coir / Eco Earth | Tropical humidity profile; raises enclosure RH too high for arid species |
| Peat moss | Acidic pH kills CUC organisms |
| Gravel or stone | Not bioactive; hard substrate; no root or CUC function |
The Moisture Gradient
The moisture gradient is the most important and most misunderstood aspect of arid bioactive setups.
Top layer (1–2 inches): dry. This allows the dragon to dig naturally without compaction, prevents surface bacteria blooms, and maintains the correct ambient humidity reading for the enclosure. A damp surface in an arid setup rapidly breeds pathogenic bacteria.
Middle layer (2–4 inches): slightly moist. This is the root zone and the primary isopod habitat. Isopods move through this layer breaking down organic matter.
Bottom layer (bottom 1–2 inches): moist but not wet. Springtails concentrate in the deepest, most consistently moist layer. This is where the most intensive decomposition occurs. A permanently moist deep layer also provides a water reserve the CUC draws from during the enclosure’s dry periods.
How to achieve the gradient: Water the substrate thoroughly when filling the enclosure. The top will dry naturally under the basking lamp over 24–48 hours. Maintain the gradient by creating a “wet spot” on the cool side — a section of substrate under a cork bark hide that is misted twice weekly. This gives the CUC a refugium zone when the rest of the enclosure is dry.
Step 2 — Clean-Up Crew (CUC)
Why Arid CUC Is Different
The most common mistake in bearded dragon bioactive setups is using standard reptile CUC products designed for tropical enclosures — giant white isopods, dairy cow isopods, and most tropical springtail cultures. These species require 60–80%+ ambient humidity to survive and reproduce. In a bearded dragon enclosure running at 30–40% humidity with surface temperatures exceeding 100°F, they die off within weeks.
Arid bioactive setups require CUC species that have evolved to handle heat and low moisture — tolerating dry periods between the wet spots, withstanding daytime temperatures significantly higher than tropical vivarium norms.
Recommended CUC Species
| Species | Drought Tolerance | Primary Function | Notes |
|---|---|---|---|
| Powder blue isopods (Porcellionides pruinosus) | High | Waste decomposition; substrate aeration | Best choice; fast reproducing; hardy |
| Powder orange isopods | High | Same as powder blue | Can co-habitate with powder blue |
| Arid springtails | Moderate | Deep substrate decomposition; fungus control | Requires moist lower layer; important baseline |
| Darkling/mealworm beetles | High | Burrowing; additional decomposition | Adults typically not eaten by dragons; supplement CUC |
Source: BioDude’s arid CUC guidance
Introducing CUC
Introduce the CUC before the dragon — at least 2–4 weeks before. The colony needs time to establish and begin breeding before the waste load of a full-grown bearded dragon arrives.
- Place at least one starter culture (50–100 individuals) of powder blue/orange isopods on the cool side, near the wet spot under the hide.
- Add arid springtails to the substrate surface — they’ll burrow into the deep moist layer.
- Lay a layer of leaf litter (oak or magnolia leaves) over the cool side as the CUC’s primary food source.
- Supplement with dried mushroom, dried cat food pellets (plain), or commercial isopod food every 2–4 weeks.
Step 3 — Live Plants
Selection Requirements
Every live plant in a bearded dragon bioactive must meet three criteria:
- Drought tolerant: The enclosure runs dry at the surface; plants must survive low watering frequency and heat.
- Safe if consumed: Bearded dragons bite and eat plants. If the plant isn’t safe to eat, it doesn’t belong in the enclosure.
- Pesticide-free: Buy from reptile plant suppliers, or quarantine nursery plants for 4–6 weeks to allow systemic pesticide residues to clear from the tissue.
Use The Tortoise Table to verify any plant not on the confirmed-safe list below.
Recommended Plants
| Plant | Notes |
|---|---|
| Agave | Drought tolerant; safe; avoid sharp-tip varieties |
| Echeveria (hens and chicks) | Compact; handles heat; easy to source |
| Haworthia | Lower-light tolerant; good for corners |
| Gasteria | Robust; handles neglect |
| Spineless prickly pear (Opuntia) | Edible pads; remove all glochids before planting |
| Tillandsia (air plant) | No soil needed; attach to hardscape |
| Hibiscus | Edible leaves and flowers; grows quickly |
| Dandelion | Safe forage; edible; grows readily from seed |
| Festuca / Carex grasses | Natural ground cover; safe |
Planting and Growth Lighting
Plant into the substrate at the cool-to-middle zone of the enclosure — plants placed directly under the basking lamp will dry out and die. Their roots will grow down into the moist middle layer, anchoring them and drawing water.
Install a 6500K LED grow light (the Arcadia Jungle Dawn is well-regarded) positioned to cover the planted area. Run it on the same 12-hour timer as the main lighting. Without a dedicated grow light, most plants will etiolate and die within weeks under standard reptile lighting alone.
Allow plants 2–4 weeks to establish before the dragon is introduced. Young plants are easily dislodged; give them time to root before a large lizard is walking over them.
Step 4 — Hardscape and Decoration
With substrate and CUC in place and plants rooting, add the hardscape:
- Cork bark log: warm side as basking platform; cool side as the hide with the wet spot underneath
- Flagstone stacks: multiple basking levels; the weight also stabilises the substrate surface under heat
- Driftwood or branches: climbing and foraging; create hiding pockets for CUC at the base
- Additional leaf litter: spread over the cool side surface as a naturalistic covering and ongoing CUC food
Step 5 — Curing: The 2–4 Week Wait
Once the setup is complete, allow 2–4 weeks before introducing the dragon. During this period:
- Verify basking temperature reaches 108–113°F / 42–45°C with an IR gun
- Verify ambient humidity holds at 30–40%
- Confirm the moisture gradient is establishing (cool-side wet spot; surface remains dry under the lamp)
- Check that CUC is active and visible near the cool side wet spot
- Allow plants to root and show new growth
Do not rush this stage. A dragon introduced to an unstabilised setup disrupts the CUC establishment and can cause the bioactive to fail in the first few weeks.
Maintenance — What Changes in a Bioactive Setup
The maintenance rhythm of a bioactive enclosure is different from a standard setup — and for most keepers, significantly less intensive after the first 4–6 weeks.
| Task | Standard Setup | Bioactive Setup |
|---|---|---|
| Faeces removal | Spot clean daily/every 2 days | CUC handles; spot check 2x/week |
| Substrate change | Every 2–6 months | Not typically needed (12–18 months minimum) |
| Water dish | Daily | Daily |
| Glass cleaning | Weekly | Weekly |
| CUC feeding | n/a | Leaf litter top-up every 2–4 weeks |
| Plant watering | n/a | Based on plant type (weekly or less) |
| Substrate moisture check | n/a | Check cool-side wet spot weekly |
Signs of a healthy bioactive:
– CUC visible and active near wet spots
– Substrate surface dry; cool-side substrate moist under the hide
– No persistent odour (CUC is processing waste effectively)
– Plants showing new growth
Signs of a struggling bioactive:
– CUC population declining (check moisture gradient; check for pesticide introduction)
– Substrate consistently wet at the surface (misting too frequently; drainage issue)
– Persistent bad odour (CUC overwhelmed; add more isopods or reduce dragon waste load temporarily)
Summary — Build Sequence
| Step | Action |
|---|---|
| 1 | Fill enclosure with 6”+ bioactive substrate; achieve moisture gradient |
| 2 | Add leaf litter and wet spot on cool side |
| 3 | Introduce CUC (isopods + springtails); begin supplemental feeding |
| 4 | Plant drought-tolerant species; install 6500K grow light |
| 5 | Add hardscape (cork bark, flagstone, driftwood) |
| 6 | Verify temperatures and humidity |
| 7 | Cure 2–4 weeks |
| 8 | Introduce the dragon |
A well-built bioactive enclosure is genuinely the best environment you can provide for a bearded dragon in captivity — richer, more active, and more interesting for both the animal and the keeper.
Frequently Asked Questions
Does this bioactive guide replace the main tank setup guide?
No. The tank setup guide covers the full enclosure build — all lighting, heating, thermostat positioning, and equipment selection. This bioactive guide covers the specialised layer on top: substrate biology, CUC species selection, moisture gradient management, and plant choices. You need the main tank setup guide first; this guide adds the bioactive layer to a correctly functioning enclosure.
Is a bioactive setup appropriate for juvenile dragons under 12 months?
Bioactive setups are best suited to adult dragons. Juveniles eat more insects, produce variable waste output, and need more direct husbandry monitoring for growth tracking. Starting with simple, visible substrate (tile or paper towel) for the first 12 months makes health monitoring significantly easier. Most keepers transition to bioactive at the adult stage after establishing good husbandry baselines.
Does a bioactive substrate change the temperature management requirements?
No — temperature targets remain identical. Basking surface should still reach 108–113°F / 42–45°C measured with an IR gun; cool side 77–85°F / 25–29°C. Bioactive substrate depth can slightly delay surface heat transfer, so always verify actual surface temperatures directly after completing the build. See the temperature guide for the full calibration approach.
Does the bioactive setup eliminate all substrate maintenance?
Largely yes for substrate changes — a well-established bioactive can run 12–18 months without a full refresh. However, it does not eliminate all maintenance. Glass cleaning, water dish management, CUC feeding (leaf litter top-up), and plant care continue. The reduction is in substrate change frequency and depth of clean-outs, not in cleaning entirely.
Can bioactive principles be applied to outdoor enclosures?
Yes. The substrate biology, plant selection, and CUC principles in this guide translate directly to permanent outdoor setups, with adaptations for local rainfall, climate, and seasonal plant availability. For outdoor structure requirements — predator protection, shade, and safety protocols — see the outdoor enclosure guide.
This article is for educational purposes only and is not a substitute for advice from a qualified exotic animal veterinarian. If your bearded dragon shows changes in appetite, digestion, or behaviour after transitioning to a bioactive setup, consult a reptile-experienced vet.