If your bearded dragon has laid eggs, you have a narrow window to get them into proper incubation conditions. Eggs don’t need days of time; they need the right environment within hours of laying. This guide covers the complete incubation process — from collecting eggs from the nesting box through to the hatchlings emerging.
For the complete breeding process, including female health risks and minimum breeding requirements, see the bearded dragon breeding guide.
Quick Answer: Bearded Dragon Egg Incubation Basics
Bearded dragon eggs incubate at 82–85°F / 28–29°C with 70–80% humidity in a sealed container of moist vermiculite. Eggs hatch in approximately 55–75 days at this temperature. Never rotate eggs. Candling at 7–14 days reveals fertile eggs (blood vessels, chalky white appearance) vs infertile ones (yellow/clear, no growth).
Before the Eggs Arrive: Setting Up Your Incubator
Prepare the incubator and incubation containers before the eggs are laid — not after. An incubator that has been running for 24+ hours will have stable, verified temperatures. One you switch on the day the eggs appear may not be calibrated correctly.
Incubator options:
– Commercial reptile incubator: Most reliable for temperature stability; models with a thermostat and digital display are recommended
– DIY cooler or modified wine fridge: Works but requires more monitoring
– Regardless of type: use a separate digital thermometer placed inside the incubator — do not rely solely on the unit’s displayed temperature
Incubation container setup:
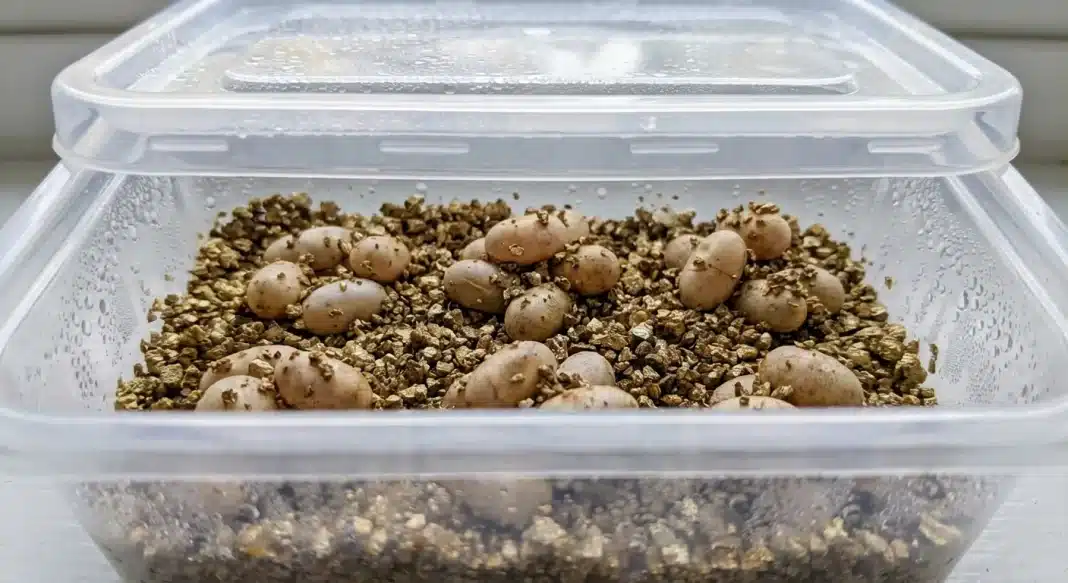
– Small sealed plastic container with a tight-fitting lid (Stewart hatchling boxes are commonly used; any sturdy container works)
– No ventilation holes needed — the sealed container traps humidity
– Fill with 2–3 inches of moist vermiculite: mix at approximately 2:1 (weight of vermiculite : weight of water). Squeeze test: the substrate holds its shape when squeezed but releases no more than one or two drops. If it drips, it’s too wet.
– Pre-warm the container inside the incubator for several hours before adding eggs
Collecting and Transferring Eggs
Timing: Collect eggs within 24 hours of laying. The sooner they’re in a controlled environment, the better.
Marking: Before you move a single egg, mark the top of each one with a soft pencil (not a pen — the solvent can penetrate the shell). A small circle or the egg’s number is sufficient. This preserves orientation — the embryo attaches to the inner egg wall within the first few days and must remain right-side-up.
Rotation rule: Do not rotate eggs after the embryo has attached. Moving an egg in the first 72 hours carries some risk; rotating it past 72 hours almost certainly detaches the embryo from the egg wall, killing it. Mark and maintain orientation from the moment you collect each egg.
Positioning: Create small depressions in the vermiculite for each egg. Eggs should be slightly buried but the marked top should face upward. Leave 1–2cm gaps between eggs — they expand during incubation and should not fuse together or press against each other.
Incubation Parameters
Temperature
Target range: 82–85°F / 28–29°C. The sweet spot that most experienced breeders target is 84°F / 29°C.
Effect on duration: Temperature determines how quickly the eggs develop.
– At 85°F: shorter incubation, approximately 55–60 days
– At 82°F: longer incubation, approximately 70–75 days
– Consistent temperature within this range produces more uniform hatch results than fluctuating temperatures
Danger zones:
– Above 90°F / 32°C: Embryos die rapidly at sustained temperatures above this level. A power failure that causes a heating spike — even brief — can kill an entire clutch.
– Below 78°F / 26°C: Development stalls. Embryos in prolonged cold may survive briefly but typically die if the low temperature is sustained.
Monitoring: Check the incubator temperature daily. Verify with the backup thermometer inside the unit. Small fluctuations (within 1–2°F of target) are acceptable; sustained deviations are not.
Humidity
Target: 70–80% humidity inside the sealed incubation container. This is maintained by the moisture in the vermiculite, not by misting.
Critical rule: Do not mist eggs directly. Surface moisture on the egg promotes mold growth and interferes with gas exchange through the eggshell. If you notice the incubation container is drying out (eggs appearing slightly dimpled), add a small amount of water to the vermiculite around the eggs — not on the eggs.
Condensation: If you notice water droplets forming on the underside of the container lid, carefully wipe them away. Drops falling directly onto eggs can cause mold. This is a sign your mix may be slightly too wet — allow some moisture to evaporate with a brief lid-off period.
Development Timeline
| Period | External Appearance | Internal Development |
|---|---|---|
| Days 1–7 | Eggs appear white/cream, stable | Cell division begins; embryo starts forming |
| Days 7–14 | Fertile eggs may start turning chalky white | Blood vessels developing; visible via candling |
| Days 14–28 | Chalky white appearance expands; eggs growing | Embryo mass enlarges; major organ formation |
| Days 28–55 | Eggs substantially enlarged; very opaque | Embryo fills most of egg; scale/skin forming |
| Days 55–75 | Pre-hatch signs begin | Embryo fully formed; absorbing remaining yolk |
| Hatching | Water beads, dimpling, pip | Baby breaks through eggshell |
Candling: How to Check for Development
Candling is holding a light against an egg to see through the shell. It tells you whether an egg is fertile and developing or infertile.
When to candle:
– First candling: 7–10 days after collection
– Optional second check: 14–21 days
– After 28+ days, eggs are usually too opaque to get useful information
How to candle:
1. Use a small, focused penlight or phone flashlight (not a hot incandescent bulb)
2. Dim the room
3. Bring the light to the egg — do not lift the egg out of its depression to bring it to the light
4. Hold the light firmly against the egg surface and look through
What a fertile egg looks like (early): A reddish ring or network of blood vessels radiating from a central point. The egg contents appear pinkish-red with visible vessel structure.
What a fertile egg looks like (mid-incubation): Chalky white, opaque. The egg has expanded. A darker mass (the embryo) may be visible.
What an infertile egg looks like: Yellow or clear; no visible vessels; the egg looks hollow or uniform inside. It does not expand during incubation.
Fertile vs Infertile Eggs: What to Do
Infertile eggs: Place in a separate container and continue monitoring for 2–3 weeks. Early candling is not always definitive — some viable eggs show poor vessel development at 7 days. If after 21 days there is still no visible development and the egg has not grown, it is likely infertile.
Mouldy eggs: Remove immediately and isolate. Mould on one egg spreads to adjacent eggs. Isolate the suspect egg into a small container and continue incubating separately. If the mould is extensive, the egg is lost — but removing it promptly protects the rest.
Never discard eggs based on appearance alone (yellow colouration, slight flattening) without candling or waiting the appropriate development period.
Common Failure Modes
| Problem | Likely Cause | Prevention |
|---|---|---|
| Eggs die within first 2 weeks | Temperature too high; rotation after embryo attachment | Calibrate incubator first; mark and never rotate eggs |
| Eggs stop developing mid-incubation | Temperature too low or fluctuating | Monitor daily; use backup thermometer |
| All eggs go mouldy | Substrate too wet; direct moisture on eggs; bacterial contamination | Correct vermiculite ratio; never mist eggs; use clean hands and tools |
| Individual egg goes mouldy | Bacterial contamination of that egg | Isolate immediately; monitor rest |
| Eggs dimple and shrivel | Humidity too low | Add small amount of water to substrate (not on eggs) |
| Eggs fail to hatch past day 80 | Temperature too low throughout; late power disruption | Review temperature log; allow additional time to day 90 before investigating |
Pre-Hatch Signs and Hatching Protocol
In the days before hatching, you’ll see a predictable sequence:
- Water beads on the egg surface — tiny water droplets appear on the outside of the shell; typically 24–48 hours before hatching
- Eggs dimple or cave slightly — the embryo is repositioning inside, drawing in the last of the yolk; this is normal
- Pip — the baby uses its egg tooth to break through the eggshell; a small hole or slit appears and the egg deflates slightly around the opening
After pipping: Do not help the baby out. The hatchling may sit in the egg with just its head through the pip for 12–48 hours, absorbing the remaining yolk sac through its belly button. Assisting premature removal risks tearing the yolk connection, causing the hatchling to bleed out.
Only intervene — and only under veterinary guidance — if a hatchling has been pipped for more than 72 hours with no progress and appears to be struggling.
After full emergence: Leave the hatchling in the incubation container for 24 hours. Their movement and scent help stimulate remaining eggs in the same container to hatch.
Residual yolk sac: Some hatchlings emerge with a small external yolk sac still attached. Do not pull, squeeze, or cut this. It will absorb naturally within 24–48 hours.
Hatchling First Steps
Once hatchlings have been in the incubation container for 24 hours and any yolk sac is absorbed:
– Transfer to a hatchling-appropriate enclosure (paper towel substrate, small warm hide, basking spot at 100°F, low UVB initially)
– Do not feed for the first 24 hours post-transfer; they are still metabolising yolk nutrients
– Offer appropriately sized feeders (1/4-inch crickets or small discoid roaches) on day 2
– Calcium supplement at every feed from the beginning
For full hatchling care guidance, see the bearded dragon care guide.
Incubation Checklist
- [ ] Incubator set up and running 24+ hours before eggs arrive
- [ ] Backup thermometer placed inside incubator
- [ ] Vermiculite prepared at 2:1 ratio (no drips)
- [ ] Eggs collected within 24 hours of laying
- [ ] Each egg marked with pencil on top surface
- [ ] Eggs positioned in depressions; not touching; marked side up
- [ ] Temperature confirmed at 82–85°F
- [ ] Humidity at 70–80% (sealed container)
- [ ] First candling at 7–10 days
- [ ] No misting of eggs directly at any time
Frequently Asked Questions
Is this egg incubation guide also the breeding guide, or do they cover different parts of the process?
They cover different stages. The breeding guide covers everything from pre-breeding conditioning through the female’s gravid period and egg laying. This guide begins where that one ends — the moment eggs are collected from the laying box — and covers incubation container setup, temperature, humidity, monitoring, candling, and hatchling emergence. Both guides are required reading for anyone undertaking a complete breeding project.
Does this guide cover infertile eggs and how to distinguish them from viable eggs?
Yes. Infertile (slug) eggs are identified through the candling protocol described in this guide. Slugs typically appear yellow, deflated, or fail to show the pink blushing of a developing embryo under candling light. Removing infertile eggs promptly prevents mould spread to viable eggs. This guide covers the candling schedule and what to look for at each stage.
Is the incubation temperature range here consistent with the temperature standards used across the pillar?
The incubation temperature parameters (82–85°F / 28–29°C) are specific to egg incubation and are separate from the canonical enclosure temperature ranges defined in the pillar standards. Do not apply enclosure basking temperatures to incubation. The egg-specific temperature range cited here comes from established hatchery practices; see the temperature guide for the full enclosure temperature standards used in all non-breeding articles.
Does hatchling care — after the eggs have hatched — fall within the scope of this guide?
Hatchling emergence is covered here through the first 24–48 hours (do not disturb eggs during hatching, timing, when to move hatchlings to a vivarium). Long-term hatchling care — enclosure setup, feeding, supplements, early husbandry — is covered in the bearded dragon care guide and feeding schedule guide, which address the hatchling life stage throughout.
Does incubation temperature affect hatchling sex, as it does in some other reptile species?
No. Bearded dragons have genotypic sex determination — sex is determined by genetics (ZZ for males, ZW for females), not incubation temperature. This is different from species like tortoises and some other lizards where temperature-dependent sex determination (TSD) is the mechanism. Genetics-based sex inheritance in bearded dragons is covered in the genetics basics guide.