Corn snake eggs incubate at 78–82°F with humidity above 90% inside a sealed container. Use perlite or vermiculite mixed at 1:1 by weight with water as the medium. Most clutches hatch in 55–65 days. Candle eggs at day 14 to confirm fertility; remove infertile eggs promptly to prevent fungal spread.
Getting the incubation right is where all the work of the breeding season pays off or doesn’t. Corn snake eggs are forgiving compared to some species, but they still need stable temperature, consistent humidity, and attentive monitoring for the 55–65 days between laying and hatching.
This guide covers everything from incubator selection through the hatching process. If you’re at the stage where you need this article, the egg-laying is done — the eggs are either in the lay box or already in your incubation container. For the full breeding context that got you here, see our how to breed corn snakes guide.
Setting Up the Incubator
Temperature is the most critical variable. Development rate, hatch success, and hatchling health all depend on maintaining 78–82°F consistently throughout the incubation period. A one-degree drift within that range is fine; sustained temperatures outside it are not.
Incubator options:
Commercial reptile incubators are the simplest option. Units designed for reptile egg incubation include a thermostat, temperature display, and sometimes humidity monitoring. They’re reliable and remove the thermostat-accuracy guesswork from the equation.
DIY incubators are common in the breeding hobby and work well when built correctly. The basic design: an insulated box or container (foam cooler, modified plastic storage tub) with a reliable heat source (heat tape, ceramic heat emitter, or heat cable) and a quality thermostat. The key is the thermostat — without temperature regulation, a heat source will overshoot. Use a digital thermostat with a probe inside the incubation zone, not a basic on/off dimmer.
Setup before eggs go in:
– Run the incubator for at least 24–48 hours before the eggs are placed
– Confirm temperature stability at the target (78–82°F) with a separate probe thermometer or temperature gun — verify the incubator’s built-in display is accurate
– A 1–2°F variance between different spots inside the incubator is normal; more than that suggests airflow or hotspot issues to resolve before eggs enter
Preparing the Incubation Container
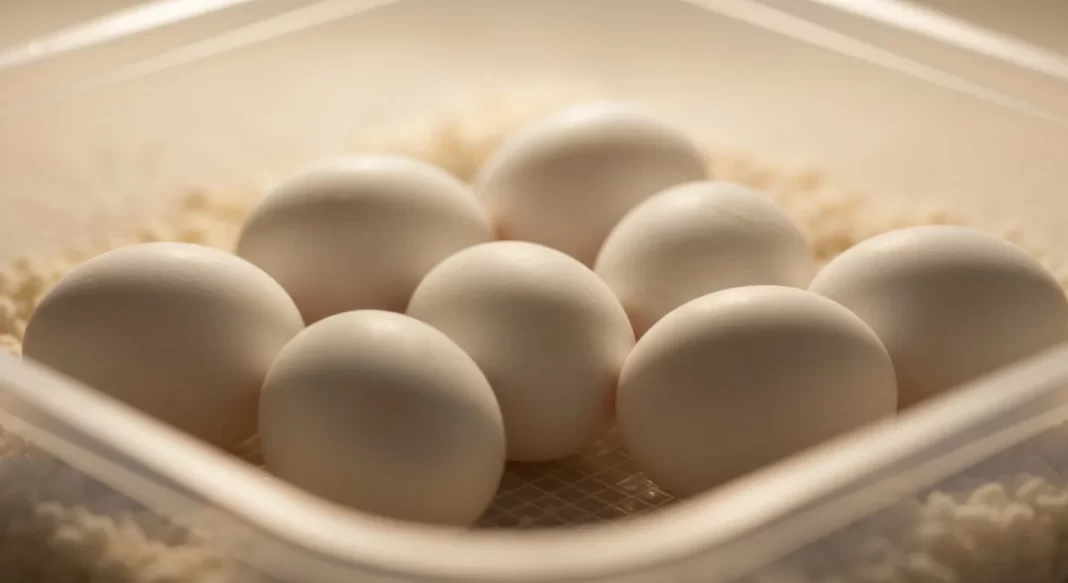
The eggs themselves go inside a sealed container within the incubator — not directly on the incubator’s floor or surface.
Container: A plastic storage container with a tight-fitting lid. The sealed container maintains the high humidity the eggs need without requiring external humidification. Size: large enough that eggs can be spaced with 1–2 cm between them.
Medium options:
– Perlite (expanded volcanic glass) — excellent moisture retention, sterile, widely available
– Vermiculite (expanded mineral material) — similar retention, also widely used
Both work equally well. Use whichever is available.
Mixing the medium:
The ratio is 1:1 by weight — equal parts dry medium and water by weight, not volume. Volume measurement is unreliable because medium compresses differently depending on how you pack it.
- Weigh 100g of dry medium on a kitchen scale
- Add 100g of water (100ml, since water is 1g/ml)
- Mix thoroughly and allow to sit for a few minutes
- The squeeze test: grab a handful and squeeze firmly. Very little to no water should drip out. If it’s dripping freely, it’s too wet — add more dry medium. If the medium crumbles apart completely when squeezed, it’s too dry — add a few ml of water.
Fill depth: A layer of 3–5 cm is sufficient. The eggs will rest on or be partially embedded in this medium.
Receiving and Placing the Eggs
When eggs come from the lay box:
Examine each egg as you move it. Healthy eggs are firm, turgid, and white-cream coloured. Very soft or liquid-filled eggs on day one are likely infertile. Eggs stuck together in a clutch mass are normal — don’t force them apart. The eggs will naturally separate as incubation progresses, or you can very gently separate joined eggs with a clean finger in the first 24 hours before the embryo attaches.
Marking orientation:
The embryo attaches to the side of the egg that faces up. Once it has attached (within the first few hours to a day), rotating the egg can drown the embryo. Before moving any egg, mark the top surface with a small pencil dot. Use pencil only — marker ink may penetrate porous eggshell.
Placement:
– Rest eggs gently on the surface of the medium, or partially bury them halfway — this is a matter of personal preference and both work
– Don’t fully cover eggs — they exchange gas through the shell
– Space eggs so they’re not touching each other if possible. If eggs are naturally joined in a clutch mass, that’s fine — leave them joined. The goal is just to avoid placing individual eggs in contact where you can control it, limiting fungal spread if one egg goes bad
Monitoring the Eggs
Candling at day 14:
Hold a bright LED flashlight against the side of each egg in a dark room. A fertile egg shows a pink-red web of blood vessels — the embryo’s developing vascular network. The network may appear as a clearly defined mesh, or as a diffuse pink glow depending on the egg’s shell opacity. An infertile egg appears uniformly opaque, “solid” looking, without visible network. Mark your results: fertile eggs get a small pencil mark at their base.
What healthy eggs look like through incubation:
– Firm and turgid throughout (slight firmness changes are normal near hatching)
– White-cream colour; may develop subtle texture or slight discolouration as development progresses
– Small white surface spots: sometimes called “fungal dusting” — minor spotting is common and generally harmless. Gently wipe the spot with a dry paper towel. Monitor for spread.
Concerning signs:
– Significant collapse and the egg stays flat (distinct from end-stage dimpling near hatching)
– Dark grey, black, or spreading yellow discolouration
– Extensive fuzzy mould growth — remove the egg immediately and check adjacent eggs carefully
– Foul smell when the container is opened — locate and remove the compromised egg
Infertile eggs: Remove promptly. Infertile eggs collapse and decompose, releasing moisture and gases that can encourage mould. Left in the container, they become a fungal inoculation risk for the viable eggs around them.
Medium moisture maintenance:
Check the medium every 7–10 days. If it has visibly dried — crumbly rather than slightly clumped — re-moisten by spritzing the medium surface (not the eggs) with water, or by adding a small amount of water to the corners of the container with a syringe. The goal is maintaining the medium moisture, not adding standing water. Condensation on the inside of the container lid is normal and a sign of adequate humidity.
Temperature and Humidity Troubleshooting
Temperature too low (below 78°F):
Development slows. Incubation period lengthens. Risk of fungal growth increases in a cooler, slower environment. If you’ve been running below target, don’t compensate by suddenly heating up — a gradual correction over a day is safer than a rapid temperature spike.
Temperature too high (above 82–84°F):
Development accelerates — which sounds positive, but accelerated development at above-optimal temperatures can cause developmental defects in the hatchlings. Sustained temperatures above 84°F carry significant risk of deformity or death. If you discover your incubator has been running hot, cool it back to target gradually. Deformities from heat exposure are generally not visible until hatching. See our corn snake temperature and heating guide for thermostat setup guidance to prevent overshoot.
Humidity dropping:
The sealed container should maintain >90% humidity passively. If humidity is consistently low:
– Check that the lid is properly sealed (no cracks or gaps)
– Re-moisten the medium as described above
– Add a second sealed container of damp sphagnum moss inside the incubator (outside the egg container) to raise ambient incubator humidity
Condensation patterns:
Some condensation on the container lid is expected and normal — it means the humidity inside is adequate. Excessive water pooling at the base of the container means the medium is over-saturated — carefully pour off any standing water.
The Hatching Process
Timeline:
At 80°F, most corn snake clutches hatch between day 60–65. At slightly cooler temperatures (78°F), hatch around day 65–70 is possible. Hatching in a healthy clutch is rarely simultaneous — some hatchlings pip on day 58, others in the same clutch on day 63. This range is normal.
Late-incubation egg dimpling:
Around 5–10 days before hatching, eggs may dimple slightly or appear to soften. This is a normal part of late-stage gas exchange and doesn’t indicate a problem. It’s distinct from collapse: a dimpling egg still has form and rebounds slightly; a dead egg collapses flat and stays flat.
Pip slits:
The first sign of active hatching is a small cut in the eggshell — made by the hatchling’s egg tooth (a temporary sharp structure on the nose tip). The slit may be 5–10mm long. The hatchling will typically rest with just its nose through the pip slit, tongue-flicking the outside air.
Leave them alone:
Hatchlings routinely spend 24–48 hours with just their nose through the pip slit before fully emerging. They’re absorbing the remaining yolk sac during this time and should not be disturbed. Don’t pull them out, don’t cut the egg open, don’t enlarge the slit.
When to be concerned:
If a hatchling has its nose through a pip slit for more than 72 hours without further emergence, and appears lethargic rather than tongue-flicking normally, this might indicate difficulty. Before any intervention, consult a reptile-experienced vet — forced assistance can rupture an attached yolk sac, which is fatal. The vet may recommend cautious assisted hatching or simply continued waiting. See our corn snake health problems guide for escalation guidance.
After Hatching
Moving hatchlings:
Once a hatchling has fully emerged, move it to an individual small enclosure. A small deli cup or 6-quart plastic container with ventilation holes and a paper towel substrate is appropriate for the first weeks. Corn snake hatchlings can and do attempt to consume each other — individual housing from day one is not optional.
First shed:
Hatchlings will shed their first skin 7–14 days after hatching. This is expected and normal — don’t offer food before this shed. The hatchling needs to clear this developmental milestone before feeding begins. Monitor for stuck shed on the first shed; see our corn snake shedding guide for shed stage guidance if needed.
First feeding:
After the first shed, offer a pinky mouse (frozen-thawed, fully thawed and warmed to body temperature) using tongs. Some hatchlings take immediately; others refuse for 2–3 attempts. If after 3–4 attempts over 2–3 weeks the hatchling still hasn’t eaten, the hatchling feeding troubleshooting protocol in our corn snake diet and feeding guide covers the specific techniques (scenting, braining, warming) for reluctant hatchling feeders.
Egg container cleanup:
Once all eggs have either hatched or been confirmed non-viable, dispose of the hatched shells and infertile eggs. Clean and sterilise the container before the next breeding season.
Frequently Asked Questions
How do I know if a corn snake egg is dead?
At day 14, candle the egg: no vascular network visible = likely infertile or early death. After day 14, watch for colour changes (significant yellowing, dark grey/black spreading) and sustained collapse. A firm white-cream egg that candled fertile at day 14 is almost certainly progressing normally even if it doesn’t look dramatically different week to week. When in doubt, leave the egg in the container a few extra days — removing a viable late egg is the bigger mistake.
One of my eggs collapsed — is it dead?
Collapse late in incubation (days 50+) with pip activity happening in the clutch around it: possibly just normal late-stage gas exchange. Collapse early in incubation with no change: likely dead. The reliable test is candling — a dead egg will appear uniformly opaque without a vascular network. A collapsed egg with visible vascular network on candling is still alive; the collapse may be a temporary pressure response. Give it a few more days.
Can I open the incubation container to check on the eggs?
Yes, briefly — a quick check every 7–10 days is fine. Don’t leave it open for extended periods; you’re releasing the humidity you’ve built up. Rapid in-and-out checks (30–60 seconds) have no meaningful impact on humidity.
My eggs have small white spots — is this a problem?
Minor surface spotting is common and usually harmless — a form of surface crystallisation from the eggshell’s calcium or early surface contact with the medium. Wipe gently with a dry paper towel and monitor. If spots spread rapidly, become fuzzy in texture, or the egg becomes soft, that’s active fungal growth — remove the egg. Compare the spotted egg to adjacent healthy eggs; healthy eggs just have white spots, not spreading fuzz.
The information in this guide is intended for general educational purposes. Always consult a qualified reptile veterinarian for health concerns specific to your animal.