Ball python eggs incubate at 88–90°F with humidity above 90% inside the container. Incubation takes 55–60 days. Use a sealed plastic container with moistened vermiculite or perlite, and never rotate eggs from their laying orientation — the embryo sits at the top of the egg, and inverting it can be fatal. Neonates often sit in the pip for up to 48 hours before fully emerging; this is normal.
Collecting the Eggs
A female ball python will coil tightly around her clutch immediately after laying. She won’t eat during this period, and she’ll stay with the eggs until they’re collected.
Collect the eggs within a few hours of laying. Before moving any egg, mark the top of each one with a soft marker or piece of tape — this records the orientation. Once marked, carefully slide the eggs into your incubation container, maintaining the marked-top orientation throughout.
Do not rotate or invert the eggs. The embryo rests against the top of the egg. Turning an egg upside down repositions the embryo away from the air space, and this can cause the embryo to drown. Once orientation is set at laying, it stays fixed.
Leave bonded eggs together. Ball python eggs often bond to each other and to the female during laying. Forcing apart eggs that are naturally stuck risks tearing the membrane. If a clutch is bonded, incubate it as a unit.
Identify and remove slugs. Infertile eggs — called slugs — are typically smaller, yellow or pale-coloured, and may feel deflated. Remove them from the clutch; they can mold and contaminate the container. If you’re unsure, leave the egg in place initially and check again at the 7–14 day candling window.
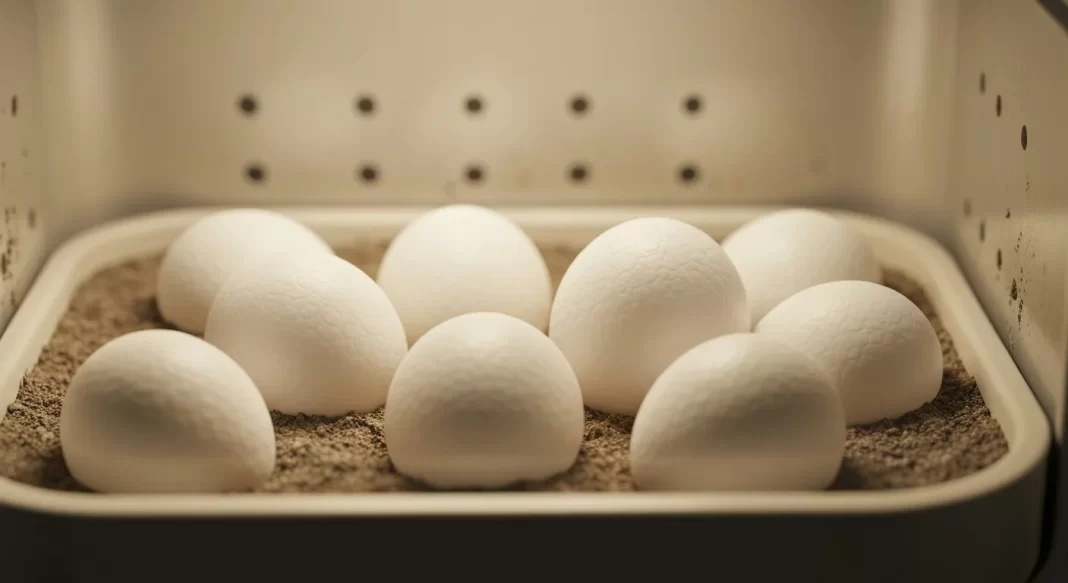
Setting Up the Incubation Container
Container Choice
A standard sealed plastic container — tupperware or a similar food-storage box — works well. Drill or melt a few small ventilation holes to allow gas exchange; the goal is minimal airflow, enough to prevent CO₂ buildup without losing significant humidity.
Size the container relative to the clutch. Eggs should sit half-buried in substrate with some space around them, not stacked or crammed.
Incubation Substrate
The three most common options:
- Vermiculite — the classic choice; holds moisture well, easy to source, forgiving
- Perlite — similar properties; some breeders prefer it for slightly better drainage
- Hatchrite — commercial premixed option; convenient, consistent
For vermiculite, mix at approximately 1:1 by weight with water. Squeeze a handful — it should hold together and release barely a drop when compressed. Too wet and you’ll promote mold; too dry and the eggs can desiccate.
Layer the substrate deep enough to half-bury each egg. The top half of each egg should remain exposed.
Placing the Eggs
Place each egg in the orientation it was laid (marked top facing up), half-buried in the substrate. Leave a small gap between eggs where possible for air circulation. Bonded clutches can sit as a unit — just nestle the cluster into the substrate with the original top sides facing up.
Incubation Parameters
| Parameter | Target |
|---|---|
| Temperature | 88–90°F (31–32°C) |
| Humidity inside container | >90% relative humidity |
| Duration | 55–60 days |
| Container venting | Small holes only — minimal airflow |
Stable temperature matters more than hitting a precise number within the range. Temperature spikes above 92°F are more dangerous than brief dips; prioritise keeping the high end controlled. Use a digital thermometer with a probe inside the incubation chamber to monitor actual temps — the ambient room temperature and the incubator display can diverge.
Monitoring During Incubation
“Sweating” Eggs
In the first one to two weeks, you may notice the eggs look wet or have small droplets on the surface. This is condensation — sometimes called “sweating” — and it’s a sign that humidity inside the container is at an appropriate level. It’s normal, not a sign of mold.
Candling
At 7–14 days, you can candle the eggs to check fertility. Hold a bright LED flashlight against the egg in a dark room. A fertile egg will show a pinkish tinge and, in good conditions, visible blood vessels or a darker embryo mass. An infertile egg (slug) appears yellow, opaque, or uniformly pale with no developing structure.
Candling is optional — it’s useful for identifying slugs you missed at collection, but it’s not required.
Mold and Dented Eggs
White surface mold on individual eggs is relatively common and manageable. Dab the affected area with a dry cloth or paper towel. Improving air circulation slightly can help. Monitor closely.
Green or black fuzzy mold is more serious. If a single egg is affected and the clutch is not bonded, isolate the egg immediately. If the clutch is bonded, this becomes harder to manage — monitor closely and ensure humidity isn’t excessive.
Dented or dimpled eggs can occur if humidity drops. Slightly increasing the moisture in the substrate and ensuring the container is well-sealed usually corrects minor denting. Many eggs with minor dents hatch successfully.
Hatching
Signs That Hatching Is Approaching
Around day 55–60, watch for:
– Eggs beginning to dimple or deflate slightly (the embryo is near full size and drawing on remaining fluids)
– Small slits appearing in the eggshell — this is the “pip”
Pip Behaviour
When a neonate is ready to hatch, it uses its egg tooth — a small, temporary protrusion on the snout — to slit the eggshell. You’ll see a small cut appear in the shell.
This is where patience matters. After pipping, a neonate will often sit in or at the pip for anywhere from 12 to 48 hours before fully emerging. This is entirely normal. The neonate is absorbing the remaining yolk, adjusting to the air, and gathering the energy to emerge.
Do not assist hatching prematurely. If you open an egg or pull a neonate out before it has fully absorbed the yolk sac, you can cause severe or fatal haemorrhage. The rule: only consider assisting if a neonate has been pipped for 48+ hours with no progress and appears distressed.
After Hatching
Once neonates have fully emerged, leave them in the incubation container for a short period until the yolk sac is completely absorbed and the cord stump has dried. Then move them to individual small housing: a snug tub or small enclosure with a hide, a water dish, and an appropriate substrate.
First Shed and First Feeding
Neonates will have their first shed approximately 7–14 days after hatching. Do not offer food before the first shed — neonates typically won’t eat and attempting feeding adds unnecessary stress during a sensitive period.
After the first shed, offer a first meal:
– Prey size: appropriately sized thawed prey item — a pinky or small fuzzy; no bigger than the widest part of the snake’s body
– Method: thawed to room temperature; place in the enclosure at night near the hide
– If refused: remove the prey item, wait 5–7 days, try again; first-feeding refusal is common in neonates
For more on feeding ball pythons, including handling feeding refusal, see our ball python diet and feeding guide.
Frequently Asked Questions
What temperature should ball python eggs be incubated at?
88–90°F (31–32°C). Stable temperature matters — avoid spikes above 92°F. Use a thermometer probe inside the incubation chamber.
How long does ball python incubation take?
55–60 days at the target temperature range.
How do I know if ball python eggs are fertile?
Candle at 7–14 days. Fertile eggs show a pinkish embryo or blood vessels when a bright light is held against them. Infertile eggs (slugs) appear yellow or opaque with no development.
Should I help a ball python hatch?
Only if a neonate has been pipped for 48+ hours without emerging and appears distressed. Premature intervention risks tearing the yolk sac, which can be fatal.
What are slugs in ball python eggs?
Infertile eggs. They’re typically smaller, yellow or pale-coloured, and feel deflated compared to fertile eggs. Remove them from the incubation container.
Why do ball python eggs sweat?
Condensation on the egg surface indicates good humidity inside the container. It’s normal, particularly in the first 1–2 weeks.
For full breeding guidance including pairing and egg laying, see our ball python breeding guide. For background on breeding conditioning (cool-down), see our ball python brumation guide.
ExoPetGuides provides general care information. Consult a qualified reptile veterinarian or experienced breeder mentor if you encounter problems during incubation or hatching.