Caring for axolotl eggs means moving the clutch into a clean, shallow, dechlorinated container away from the parents, holding it at a steady 16 to 20 degrees Celsius, and removing every dead or fungused egg daily. Eggs hatch in roughly two to three weeks depending on temperature, and the new larvae live on their yolk before taking live food.
Why do axolotl eggs need to leave the parent tank?
Axolotl eggs need to leave the parent tank because both adults eat eggs and newly hatched larvae within hours. The main tank also works against the clutch: filter intakes pull in or batter the eggs, and the bioload of adult waste degrades the stable, clean water embryos need. A dedicated container gives you full control.
Axolotls have no parental instinct. Both the male and the female treat any egg within reach as food, which is why keepers remove the male right after spawning and remove the female once she finishes laying, or move the eggs out instead. This egg-eating is opportunistic feeding, not aggression, and it is the single largest cause of a clutch vanishing overnight. A single female lays a large clutch, typically between 200 and 1,500 eggs, with first-time spawners on the low end and well-conditioned females on the high end (source: San Diego Zoo Wildlife Alliance). The clutch arrives over a wide window, since a female sheds her eggs over a period of one to two days and never lays them in a single clump (source: Ambystoma Genetic Stock Center). That spread means parents have many hours to graze on what they laid.
The tank environment is the second problem. A cycled adult tank carries an organic load from feeding and waste that suits a grown axolotl but not a developing embryo, which needs near-pristine water. Filter intakes are a direct hazard, since the small jelly-coated eggs can be sucked against a strainer or knocked loose by current. Moving the clutch into a dedicated hatching container, or moving the parents out, sharply improves how many eggs survive to hatch. This guide picks up where the axolotl breeding guide leaves off, taking the fertilized clutch through to the first feeding, and it sits inside the broader husbandry framework covered by the axolotl care guide. If the spawn was a surprise rather than planned, the priority order is the same: separate eggs from adults first, then set up the container.
How do you collect axolotl eggs safely?
Collect axolotl eggs by moving whatever they are attached to. Lift out the plant or spawning mop with the eggs still on it, since that handles them least. For eggs stuck to glass or hard surfaces, slide a fingernail or a thin plastic card gently under the attachment point. Use a wide pipette or turkey baster for loose eggs, and never crowd them.
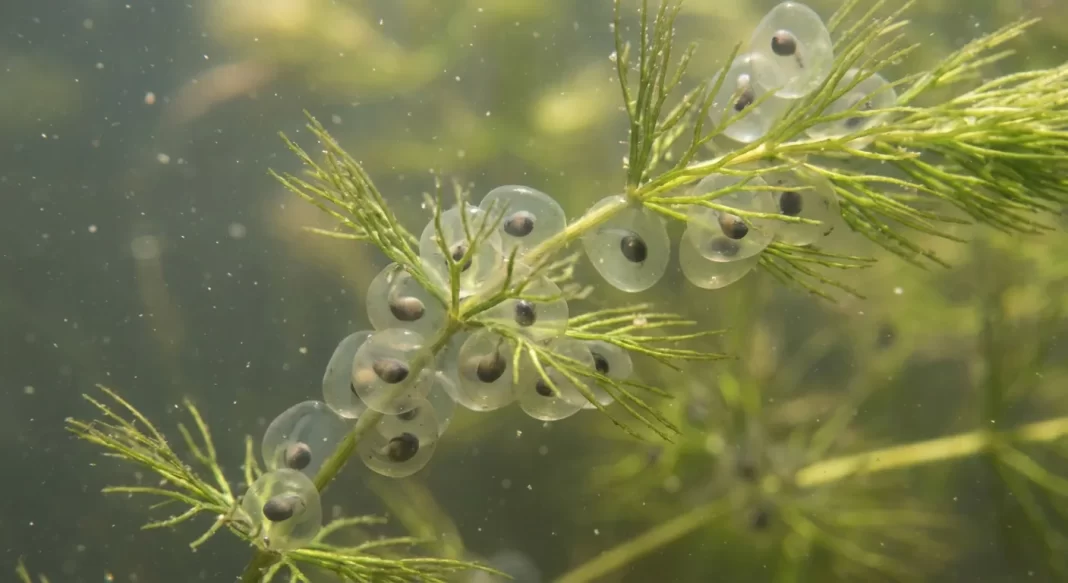
The jelly coat does most of the protecting for you. Each egg is about 2 to 3 mm across and wrapped in a clear, layered jelly that shields it from physical injury and infection (per San Diego Zoo Wildlife Alliance; jelly coat per Ambystoma Genetic Stock Center), so the goal during collection is to disturb that coat as little as possible. The cleanest method is to never touch the eggs at all: if the female laid on a removable plant, a spawning mop, or a loose decoration, lift that object straight out and rest it in the prepared container. Eggs laid directly on the glass or on a fixed surface need gentle release. Slide a clean fingernail or the edge of a thin plastic card under the jelly where it meets the surface, working slowly so the coat peels rather than tears.
For eggs that have come loose or for collecting individuals, a wide-mouthed pipette or a turkey baster lets you lift each egg in a small slug of water without pinching it. The rule that matters most here is spacing. Put no more than 50 to 100 eggs or developing embryos in each container (per Ambystoma Genetic Stock Center), because eggs packed into a dense clump shade the interior ones from oxygen and trap decay. Eggs are also laid individually rather than in a mass in the first place (per Ambystoma Genetic Stock Center), so spreading a collected clump back out simply restores their natural spacing. When I move a large clutch, I split it across two or three shallow tubs from the start rather than crowding one, since a single fungused egg in a tight cluster can take its neighbors with it before the next inspection. For the spawning surfaces that make collection easier in the first place, the axolotl breeding setup guide covers slate, mops, and broad-leaved plants.
What does the hatching container setup look like?
A hatching container is a shallow, uncovered plastic tub holding 10 to 15 cm of dechlorinated water, with no filter and no substrate. Match the breeding tank temperature, target 16 to 20 degrees Celsius, keep it out of direct sun, and change the water daily. A 5 to 10 liter tub suits 50 to 100 eggs.
Simplicity is the point. The setup has no filter, no gravel, and no decorations, because every one of those is either a hazard or a place for waste to hide. Shallow water of roughly 10 to 15 cm (4 to 6 inches) lets oxygen reach the eggs and lets you see every egg clearly during inspection. The setup table below maps each variable to its target and the reason behind it. The water targets sit inside the same safe ranges covered by the axolotl water parameters guide, and the daily-change discipline mirrors the axolotl water change schedule guide.
| Variable | Target | Why it matters |
|---|---|---|
| Container | 5 to 10 L food-safe plastic tub, no lid | Shallow and open keeps oxygen high and inspection easy |
| Water depth | 10 to 15 cm (4 to 6 in) | Enough volume to buffer temperature, shallow enough to oxygenate |
| Water source | Dechlorinated tap, matched to breeding-tank temperature | Chlorine and chloramine harm embryos; temperature swings stress them |
| pH | 6.5 to 8.0 | The species’ tolerated range; stability matters more than the exact value |
| Temperature | 16 to 20 degrees Celsius (60 to 68 Fahrenheit) | Sets hatch speed and keeps fungus and deformity risk low |
| Water changes | 100 percent daily, temperature-matched | No filter means manual changes carry the whole water-quality load |
| Aeration | Optional gentle air stone, placed away from eggs | Adds oxygen without battering the clutch |
| Lighting | Ambient room light only; no direct sun | Bright light and heat harm embryos and feed algae |
Because there is no filter doing biological work, the daily water change is not optional housekeeping; it is the entire filtration system. Use dechlorinated water that matches the container’s current temperature within a degree or two, since a cold or chlorinated top-up does more harm than a slightly overdue change. A sodium-thiosulfate dechlorinator is the standard choice, and the axolotl dechlorinator guide covers product selection and dosing. Gentle aeration helps in a crowded tub, but the air stone belongs in a corner away from the eggs so the current does not roll them. Keep the container off windowsills and away from heat sources; a stable cool spot beats a warm bright one every time. For holding that temperature in a warm room, the axolotl temperature guide covers safe cooling methods.
How do you tell if axolotl eggs are fertile or infertile?
Watch the inside of each egg over the first day or two. A fertile egg develops a visible dark embryonic spot and keeps a firm, translucent jelly coat. An infertile or failed egg stays uniformly pale, turns opaque milky white, and softens. Remove the white ones promptly, because they become fungus that spreads to healthy neighbors.
The dark embryo is the tell. A fertilized axolotl egg shows a defined dark cell mass within the first 24 hours, and by roughly day four or five that mass elongates into a recognizable comma shape with a distinguishable head and tail. An egg that never develops this dark spot, or one that goes cloudy and chalky white within the first day or two, has either gone unfertilized or stopped developing. The comparison below is the fastest sort.
| Trait | Fertile egg | Infertile or failed egg |
|---|---|---|
| Color inside jelly | Defined dark embryonic spot, develops within 24 hours | Uniformly pale; turns opaque milky white |
| Jelly coat | Firm, clear, translucent | Softens, clouds, becomes a fungus substrate |
| Early development | Comma-shaped embryo by day 4 to 5 | No change; no visible embryo forms |
| Keeper action | Leave in place; keep monitoring | Remove with a pipette as soon as identified |
Sort at the first 24-hour mark after collection, then repeat the check every day for the whole incubation. Some loss is normal and expected: a clutch that starts at several hundred eggs will not hatch every egg, and some loss to infertility and failed development is normal even with good care. The point of sorting is not to save the failed eggs, which cannot be saved, but to pull them before they grow the fungus that endangers the fertile ones beside them. A gentle backlight, such as a phone torch held to the side of the tub, makes the dark embryo easy to see without lifting the egg. Avoid prying eggs apart or turning them by hand in the first 48 hours, since the early embryo is fragile. If you are unsure whether an egg is simply slow or genuinely dead, leave it one more day and recheck; a developing embryo will keep changing, while a dead one will only cloud further.
How do you prevent and treat fungal growth on axolotl eggs?
Prevent egg fungus mainly by mechanics, not chemistry. Remove every dead, infertile, or fuzzy egg daily and change the water completely each day. As an added safeguard, a light dose of methylene blue tints the water and slows spore growth. If fungus is already spreading, isolate the healthy eggs, raise the dose, and change water more often.
Fungus on axolotl eggs is almost always opportunistic. It colonizes dead tissue first, then sends hyphae into the jelly coats of adjacent living eggs, which is why a single missed dead egg can seed an outbreak across a cluster. The first and most effective control is removal: take out every white, opaque, or visibly fuzzy egg the moment you spot it, and do a full daily water change so spores and decaying matter never accumulate. A keeper who has hatched several clutches will tell you the biggest predictor of hatch rate is not the additive in the water but the discipline of pulling dead eggs every single day. The mechanical approach alone carries most clutches.
Methylene blue is the common preventive backup, used widely in the hobby as a mild antifungal that inhibits spore germination while staying gentle enough for developing embryos. A light preventive dose of roughly one to two drops of a 2.3 percent solution per gallon (about 4 liters) tints the water pale blue while keeping it transparent enough to inspect eggs, and you refresh it with each daily water change. Two cautions matter. Keep the dose light rather than heavy, since a deeply tinted tank makes eggs hard to inspect and more dye is not better, and as a precaution many keepers discontinue methylene blue in the day or two before expected hatching so hatchlings emerge into clean, untinted water. If an active outbreak has already taken hold, follow this escalation, and stop to call a specialist if a clutch keeps failing:
- Remove all visibly infected eggs immediately, working outward from the fungus.
- Move the remaining clear, healthy eggs into a fresh container of treated water.
- Raise methylene blue toward three drops per gallon and switch to twice-daily water changes.
- Discontinue the dye 48 hours before the expected hatch date.
- If losses continue despite this, consult an exotic-animal veterinarian.
Methylene blue is one of the few aquarium medications considered safe around embryos, but dosing still matters; the axolotl medication safety guide covers safe use, and the axolotl fungus guide covers the same cotton-wool fungus on juveniles and adults.
What does the egg development timeline look like?
Axolotl eggs follow a predictable development sequence that runs about two to three weeks at room temperature. Temperature sets the pace: warmer water near 25 degrees Celsius hatches eggs in under 14 days, while cooler water near 18 degrees stretches it past 20 days. You can watch each stage through the clear jelly with a simple backlight.
Embryos kept at room temperature hatch in two to three weeks, and a lower temperature delays development while raising it toward a maximum of 25 degrees Celsius accelerates hatching (per Ambystoma Genetic Stock Center). Warm conditions push eggs to hatch in generally less than 14 days, while cooler conditions near 18 degrees Celsius (64 Fahrenheit) can mean more than 20 days (source: axolotl.org rearing guide). Managed-care figures agree on the pattern: roughly two weeks at 20 degrees Celsius (68 Fahrenheit) and three to four weeks in cooler water around 14 to 16 degrees Celsius (per San Diego Zoo Wildlife Alliance). The day-by-day table below maps a typical schedule at a steady 18 to 20 degrees Celsius; warmer water compresses it and cooler water stretches it.
| Day (at 18 to 20 C) | Stage | What you can see |
|---|---|---|
| 0 | Single cell | Round egg, dark pigmented cap, clear jelly |
| 1 | Cleavage and blastula | Surface texture changes; dark cell mass defined |
| 2 to 3 | Gastrulation | A visible indentation forms on the surface |
| 4 to 5 | Neurula and comma | Comma shape; head and tail become distinguishable |
| 6 to 8 | Tail bud | Gill buds appear; tail extends; first slow movement |
| 9 to 12 | Gill branching | Gill filaments visible; pigment develops; heartbeat may show |
| 13 to 16 | Pre-hatch | Embryo fills most of the egg; active twitching; gills formed |
| 14 to 21 | Hatching | Larvae rupture the jelly and emerge |
The single most useful thing this timeline gives you is control over your schedule. Because cooler water slows development predictably, keepers often hold eggs on the cool end to buy time for setting up a live-food culture before the larvae arrive, then know within a couple of days when to expect the hatch. Warmer water near the 25-degree ceiling speeds things up but raises both the metabolic load and the fungus risk, so the cool-to-moderate band is the safer default. Whichever target you pick, hold it steady rather than letting the container swing day to night, since stability matters more than the exact number. Watch the eggs against a soft side light: by the end of the first week you can often see the embryo twitch or slowly rotate, which confirms development better than color alone. For interpreting any water-quality reading that might stall development, the axolotl water testing guide covers the test cadence.
What should you expect when axolotl eggs hatch?
Newly hatched axolotl larvae are tiny, about 10 to 13 mm long, translucent, and equipped with external gills but no working limbs. For the first day or two they live off an internal yolk sac and barely move. They need no food until the yolk runs out, usually 24 to 72 hours after hatching, and then only live, moving prey.
Hatching is rarely simultaneous. Over a day or two the larvae rupture their jelly coats and emerge measuring 10 to 13 mm, roughly half an inch (per axolotl.org rearing guide). At this point they have external gills and a yolk sac but no functional front or back legs, and they spend the first 24 to 48 hours resting on the bottom while they absorb the yolk still visible in their bellies. Do not try to feed them during this window; they cannot eat yet and uneaten food only fouls the water. Begin feeding when you can no longer see yolk in their bellies, which is usually soon after hatching (per Ambystoma Genetic Stock Center), and in practice falls within 24 to 72 hours after hatching (per axolotl.org rearing guide).
The first food has to be alive and small, because larvae hunt by movement and ignore dead or still food entirely (per axolotl.org rearing guide). Newly hatched brine shrimp are the standard starter, with small daphnia or moina as alternatives; microworms work but are less ideal for the very youngest larvae (per axolotl.org rearing guide). The axolotl live food safety guide covers culturing and rinsing that first live food, and the axolotl feeding schedule by age guide covers the cadence as the larvae grow. Two housekeeping jobs matter the moment hatching starts. Remove the empty jelly capsules promptly with a pipette, since they decay and degrade the water. And separate hatched larvae from the still-developing eggs when hatching is staggered, both to keep feeding straightforward and because the next hazard is already arriving. Larvae will bite the limbs and gills of smaller siblings, so size-sorting begins early; the axolotl cannibalism prevention guide covers the full separation protocol that decides how many larvae survive intact.
Daily egg-care checklist
The daily routine for a clutch is short but non-negotiable. Run the same sequence every day from collection until the last egg hatches: inspect, remove the dead, remove any hatchlings and empty capsules, change the water completely, redose any methylene blue, confirm the temperature, and log the day count. Skipping a day is how clutches are lost.
The whole point of the checklist is that egg care is not labor-intensive so much as it is relentless. Each step takes minutes, but the cost of missing a day compounds fast, since one overlooked dead egg can fungus several neighbors before the next inspection. Work through the list in order, because removing the dead eggs before the water change means you are not stirring spores through the container.
- Inspect every egg for white or opaque color, fuzzy growth, and developmental progress.
- Remove all dead or infertile eggs with a pipette or soft forceps.
- Remove any hatched larvae to a separate container.
- Remove empty jelly capsules.
- Perform a 100 percent water change with fresh, temperature-matched, dechlorinated water.
- Redose methylene blue at the light preventive level if you are using it.
- Confirm the water sits within the 16 to 20 degrees Celsius target.
- Track the day count since spawning so you can anticipate the hatch.
A simple note on your phone for the day count and the number of eggs removed turns a vague worry into a clear picture of how the clutch is tracking. If your removal count climbs sharply day to day, that is the early signal to reach for the fungus-outbreak steps above rather than waiting.
Common axolotl egg problems and corrections
Most egg-care problems trace back to one of four causes: dead eggs left in place, water too warm or too cold, crowding, or rough handling. The fixes are direct. The matrix below maps each common problem to its likely cause and the correction, so you can act fast when an inspection turns up something off.
Reading the failure modes ahead of time is what lets you respond proportionally instead of panicking over normal attrition. A handful of white eggs in a large clutch is expected loss, not a crisis, while spreading fuzz across many eggs is an active outbreak that needs the escalation protocol. Use the table as the first filter.
| Problem | Likely cause | Correction |
|---|---|---|
| Widespread fuzzy growth across eggs | Dead eggs left in place; no antifungal in use | Remove infected eggs; add methylene blue; switch to twice-daily water changes |
| Scattered white eggs, no fungus | Normal infertility or failed development | Remove them; some loss is normal |
| Development slower than the timeline | Water too cold | Raise temperature gradually, at most 1 to 2 degrees per day, toward 18 to 20 C |
| Eggs bursting or collapsing | Mechanical damage during handling | Use a pipette, not fingers; avoid touching the embryo directly |
| Hatch later than expected | Normal variation, or larva needs help | Wait 2 to 3 days past the expected date before any intervention |
| Cloudy water between changes | Container too small or too many eggs | Spread the clutch across more tubs; keep 50 to 100 per container |
The correction that solves the most cases is also the simplest: more containers and more frequent water changes. Crowding drives both the fungus problem and the cloudy-water problem, so splitting a clutch is often the single fix that resolves several symptoms at once. For any persistent problem that does not respond to temperature, spacing, and daily removal, or any sign that points to infection rather than simple egg failure, consult an exotic-animal veterinarian rather than escalating medications on your own.
Frequently asked questions
How many eggs will my axolotl lay in one clutch?
A single healthy female typically lays somewhere between 200 and 1,500 eggs in one spawning, with first-time and smaller females at the low end and large, well-conditioned females at the high end. She deposits them individually over one to two days rather than in a clump. Expect natural attrition from the start, since some loss to infertility and failed development is normal even with attentive care. Plan your container space and rehoming around the realistic number that survives, not the headline egg count.
Can I just leave axolotl eggs in the parent tank?
It is not recommended. Both parents eat eggs and hatchlings, the adult tank’s filter can suck in or batter the delicate eggs, and the bioload from adult feeding and waste degrades the clean water embryos need. A dedicated hatching container gives you control over temperature, water quality, and daily inspection that the main tank cannot. The safer move is to relocate either the eggs or the parents within the first day, before the adults have grazed through much of the clutch.
Do axolotl eggs need an air pump?
An air pump is optional, not mandatory. A full daily water change alone delivers enough fresh, oxygenated water for a properly spaced clutch of 50 to 100 eggs. Gentle aeration helps in a crowded or warmer container by improving oxygen exchange, but the air stone should sit in a corner away from the eggs so the current does not tumble them. If you find yourself relying on an air pump to keep a crowded tub viable, the better fix is to split the clutch across more containers.
What happens if I miss removing a dead egg for a day?
A single dead egg left for a day usually grows visible fungal filaments that reach toward the eggs touching it. The fungus penetrates the jelly coats of adjacent eggs, so the closer and more crowded the neighbors, the more eggs are at risk. One missed egg in a well-spaced container may cost only its immediate neighbors, while one missed egg in a tight cluster can seed a wider outbreak. This is exactly why daily inspection and removal is non-negotiable and why spacing the clutch out matters so much.
How do I know when hatching is about to happen?
In the last days before hatching, the embryo fills most of the egg, twitches and rotates actively, and shows fully formed, branched external gills. The jelly coat looks thinner and more stretched as the larva presses against it. When you see these signs, reduce handling, stop disturbing the container, and discontinue any methylene blue so it does not affect the emerging larvae. Hatching is usually staggered over a day or two, so expect the clutch to emerge in waves rather than all at once.
Should I help an axolotl larva hatch if it seems stuck?
Usually no. Hatching naturally spreads over a day or two, so an egg that has not hatched while its siblings have is most often just slower, not stuck. Wait two to three days past the expected hatch date before considering any help. If a fully developed larva still has not emerged after that window, some keepers gently nick the jelly with clean forceps, but this risks injuring the larva and should be a last resort. Because it touches a living animal’s health, confirm the approach with an exotic-animal veterinarian first.
Related guides
- Axolotl breeding guide: pairing, triggers, and the clutch that produced these eggs
- Axolotl care guide: complete husbandry hub for keepers
- Axolotl cannibalism prevention: larval size-sorting once the eggs hatch
- Axolotl breeding setup: spawning surfaces that make egg collection easier
- Axolotl live food safety: culturing the brine shrimp first feeding needs
- Axolotl fungus guide: the same cotton-wool fungus on juveniles and adults
By the ExoPetGuides editorial team (AI-assisted drafting; human-reviewed), reviewed by an exotic-animal veterinarian
Updated 2026-06-02
Primary sources: Ambystoma Genetic Stock Center (University of Kentucky), axolotl.org rearing guide, San Diego Zoo Wildlife Alliance
Disclaimer: This content is for educational purposes only and is not a substitute for professional veterinary advice. Always consult a qualified veterinarian, ideally an exotic-animal specialist, for any health concern about your pet. Care recommendations may vary based on species, individual animal, and local regulations.