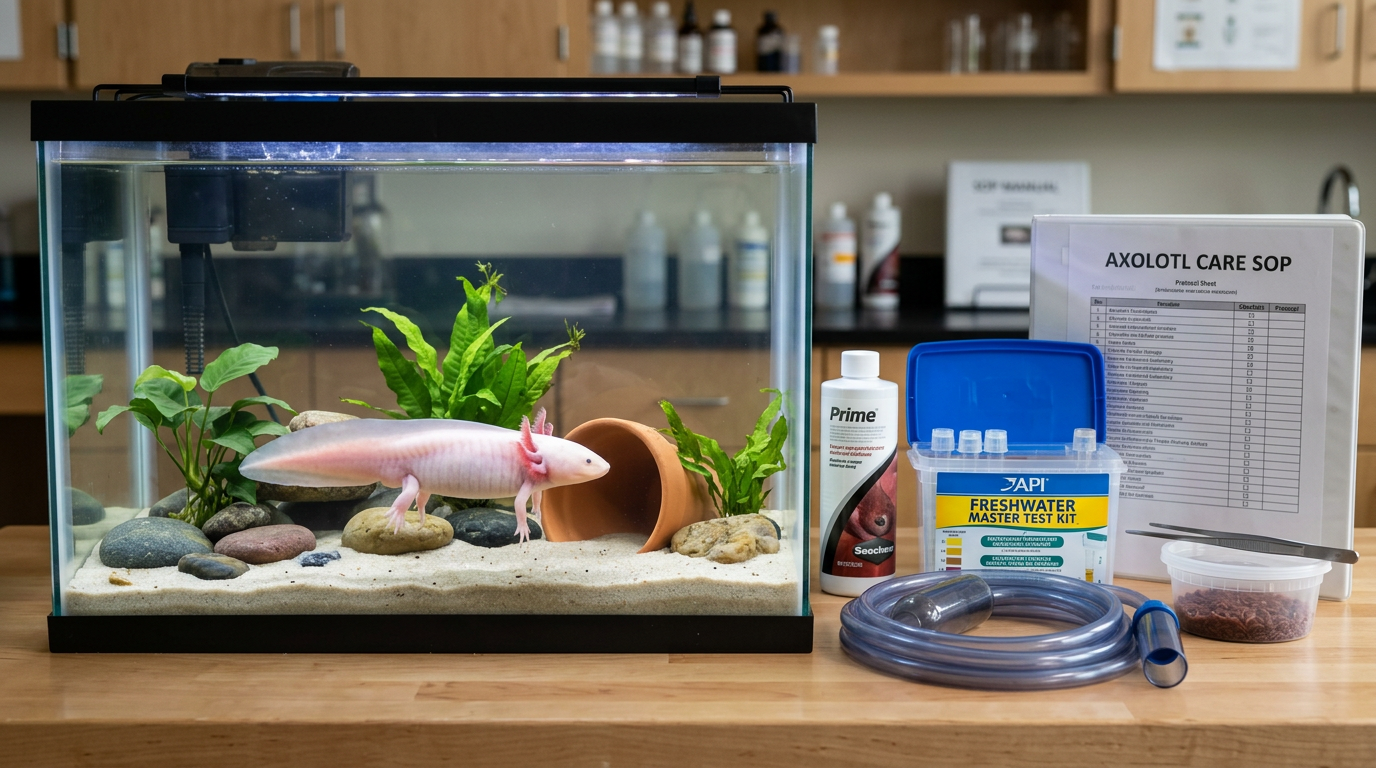
Axolotl husbandry is a repeating cycle of observation, testing, cleaning, and equipment verification that keeps water quality stable and catches health problems before they become emergencies. This standard operating procedure breaks every task into daily, weekly, monthly, and quarterly frequencies so nothing falls through the cracks during routine keeping, even after the novelty fades.
Why a written protocol prevents the most common care failures
The most frequent axolotl health problems, ammonia burns, fungal infections, heat stress, and appetite loss, trace back to inconsistent maintenance rather than a single catastrophic event. Ammonia does not spike overnight in a cycled tank; it accumulates when uneaten food sits on the substrate for days, when water changes are skipped for two or three weeks, or when a filter intake clogs without anyone noticing. A written SOP forces regular checkpoints that catch these incremental failures early.
Experienced axolotl keepers describe their maintenance routine as “boring on purpose.” When tank care is boring, when every check returns the same stable numbers, the axolotl is thriving. Excitement in axolotl keeping usually means something has gone wrong. The SOP below is designed to keep things boring.
A structured protocol also protects the animal during keeper transitions. If you travel and leave care instructions for a pet sitter, a written SOP gives them exact tasks, frequencies, and thresholds. Vague instructions like “change the water sometimes” lead to missed maintenance and parameter drift. For travel-specific planning, the travel care plan covers delegation logistics in detail.
From a rescue-intake perspective, the pattern we see most in surrendered axolotls is not dramatic neglect but quiet drift: the keeper started strong, then stopped testing weekly because the tank “looked fine,” and three months later the animal was in chronic low-level ammonia exposure. A written SOP keeps the good habits running on a schedule, not on motivation. That is a distinction that matters at month four and month fourteen, when the novelty has faded but the animal’s needs have not changed.
Daily checklist: what to do every 24 hours
Daily axolotl care takes 5 to 10 minutes and covers five checks: water temperature, uneaten food removal, waste spot-cleaning, a 60-second behavioral observation, and a written log entry for anything unusual. These tasks catch the early signals of problems that escalate fast in cool water, especially ammonia accumulation, gill stress, and appetite changes that precede visible illness by days.
Check water temperature. Read the thermometer at approximately the same time each day. The safe range for axolotls is 60 to 68 degrees Fahrenheit (16 to 20 degrees Celsius), with 60 to 64 degrees Fahrenheit as the ideal midpoint. Sustained temperatures above 72 degrees Fahrenheit are widely reported to stress axolotls and increase disease risk, with effects including reduced appetite, gill curl, and elevated infection vulnerability (source: AxolotlCentral). If the reading exceeds 70 degrees Fahrenheit, take corrective action immediately. The temperature guide covers cooling methods and heat-stress response in full.
Remove uneaten food. After each feeding, wait 15 to 20 minutes, then remove any food the axolotl has not consumed. Uneaten earthworms, pellets, or bloodworms decompose rapidly in cool water and produce ammonia. A turkey baster is the most efficient tool for spot-removing small food remnants without disturbing the axolotl or substrate.
Spot-clean visible waste. Use the same turkey baster or a small siphon to remove visible fecal matter and any debris that has settled on the substrate or tank floor. Waste left on bare-bottom tanks is easy to see; in tanks with fine sand substrate, look for dark clumps against the lighter sand. Spot-cleaning daily prevents the organic load from reaching levels that overwhelm the filter’s biological capacity between weekly water changes. Organic waste in an axolotl tank converts to ammonia through bacterial decomposition, which nitrifying bacteria in a cycled filter then process to nitrite and finally to nitrate (source: Ethical Axolotls cycling guide).
Observe the axolotl’s body and behavior. This is the most important daily task and the one most often rushed. Spend at least 60 seconds watching the axolotl actively. Check the following:
- Gills: Full, fluffy gill filaments that fan outward indicate healthy oxygenation and low stress. Forward-curled gills signal water quality problems or high flow. Pale or shrunken gill filaments suggest chronic stress or poor water parameters. The gill curl guide covers diagnosis and correction.
- Appetite: A healthy adult axolotl fed 2 to 3 times per week should strike at food within seconds of presentation. Repeated refusal across two or more consecutive feeding days warrants parameter testing and closer observation. The refusing food guide covers differential causes.
- Skin: Look for white cotton-like patches indicating fungal infection, red spots or lesions from ammonia burn or injury, and any discoloration that was not present previously.
- Movement: An axolotl resting on the bottom during the day is normal. An axolotl floating at the surface, glass surfing persistently, or curled in a J-shape may be signaling distress.
- Tail tip: A curled or deteriorating tail tip can indicate water quality stress before other symptoms appear.
Record any anomalies. Keep a simple log, paper or digital, noting the date, temperature reading, feeding response, and anything unusual. This record becomes critical when diagnosing problems or consulting a veterinarian. The record-keeping template provides a structured format.
Weekly protocol: parameter testing and water maintenance
Weekly axolotl care takes 30 to 60 minutes and centers on a 20 to 30 percent water change, six-parameter test using a liquid kit, glass cleaning, and a filter and equipment function check. This window catches parameter drift, nitrate accumulation, and equipment slowdowns before they reach harmful levels in a cycled tank.
Perform a 20 to 30 percent water change. Remove 20 to 30 percent of the tank volume using a gravel vacuum or siphon, then replace with dechlorinated, temperature-matched water. The replacement water should be within 2 degrees Fahrenheit of the tank water to avoid thermal shock. Always add dechlorinator to replacement water before introducing it to the tank. Chlorine and chloramine are harmful to axolotls; any tap water must be dechlorinated before contacting the animal (source: Axolotl.org captive requirements). The water change schedule provides tank-size-specific volumes and adjustment guidelines for higher bioloads.
Test water parameters. Use a liquid test kit, the API Master Freshwater Kit or equivalent, rather than test strips, which produce unreliable results for the precision axolotl care requires. Test and record all six parameters:
| Parameter | Safe range | Action threshold |
|---|---|---|
| Ammonia (NH3/NH4+) | 0 ppm | Any reading above 0: immediate 30-50% water change, identify source |
| Nitrite (NO2-) | 0 ppm | Any reading above 0: immediate 30-50% water change, check filter |
| Nitrate (NO3-) | Below 20 ppm | Above 20: increase water change volume or frequency |
| pH | 6.5 to 8.0 | Below 6.5 or above 8.0: investigate cause, do not chase pH with chemicals |
| GH (general hardness) | 7 to 14 dGH | Below 7 dGH: add mineral supplement or remineralize RO water |
| KH (carbonate hardness) | 3 to 8 dKH | Below 3 dKH: pH crash risk; buffer with crushed coral or baking soda |
(source: Axolotl.org care guide; community-consensus ranges from multiple care references)
Ammonia and nitrite must always read zero in a cycled tank. Any non-zero reading indicates either a cycle disruption, from filter failure, antibiotic treatment, or overfeeding, or an uncycled system. Any detectable ammonia above 0 ppm induces stress; sustained exposure damages gill tissue and impairs health over time (source: Axolotl Planet — aquarium cycling guide). The water parameters guide covers test kit technique, result interpretation, and when to escalate. The water testing guide covers how to get accurate readings every time.
For keepers with two axolotls in a 40-gallon tank: increase the weekly water change volume to 30 to 40 percent and test parameters twice weekly during the first month to establish whether your filter handles the additional bioload. Daily spot-cleaning becomes more critical because waste output roughly doubles. Track each animal individually during monthly weigh-ins and watch for aggression indicators such as nipped gill tips during daily observation.
Clean interior glass. Use an algae scraper or magnetic glass cleaner to remove algae film from the tank walls. Algae buildup does not directly harm the axolotl, but it obscures your view of the animal and the substrate, making daily observation less effective. Avoid cleaning all surfaces at once if algae is providing a food source for beneficial bacteria colonizing the glass.
Inspect filter intake and output. Confirm the filter is running at its expected flow rate. A sponge filter should produce a steady stream of bubbles. A canister filter should maintain visible outflow. Reduced flow indicates a clogged intake, blocked impeller, or saturated media. Do not deep-clean the filter during the weekly check, just verify it is functioning. Flow that is too strong for the axolotl is covered in the flow control guide.
Check equipment function. Verify that the air pump if used, heater or chiller if used, and lighting timer are operating normally. A failed chiller in summer or a stuck heater in any season can push temperatures outside the safe range within hours. Confirm thermometer accuracy by comparing against a second thermometer or a spot-check with a calibrated digital probe.
Monthly protocol: deep maintenance and health assessment
Monthly axolotl care takes 60 to 90 minutes and covers six tasks: deep-cleaning filter media in old tank water, testing heater or chiller function under load, replacing worn equipment, weighing the axolotl, full substrate cleaning, and reviewing the 30-day care log for trends that single readings miss.
Deep-clean the filter in old tank water. Remove filter media and rinse it in a bucket of water taken from the tank during the water change, never under tap water. Tap water contains chlorine or chloramine that kills the nitrifying bacteria colonizing the filter media. These bacteria are responsible for converting ammonia to nitrite to nitrate; killing them causes a partial or complete cycle crash. For sponge filters, squeeze the sponge several times in the old tank water until the water runs mostly clear. For canister filters, rinse mechanical media in old tank water and replace any media that has degraded structurally. Do not replace all media at once; stagger replacements to preserve bacterial colonies (source: AxolotlCentral; source: AxolotlCentral cycling guide).
Test heater or chiller function under load. If you use a chiller, common in warm climates or during summer months, verify it activates at the set threshold and actually reduces water temperature. Plug it in, confirm the compressor runs, and check that the output water is cooler than the input. If you use a heater with a thermostat, used mainly to prevent drops below 55 degrees Fahrenheit in cold rooms, confirm it cycles on and off at the correct setpoint. A heater stuck in the “on” position is one of the most dangerous equipment failures in axolotl keeping because it can push temperatures into the lethal range overnight. The chiller guide covers setup and troubleshooting.
Inspect and replace worn equipment. Check airline tubing for cracks, kinks, or algae buildup. Inspect suction cups and mounting hardware for deterioration. Examine the siphon or gravel vacuum for leaks. Replace any component that shows wear. Small equipment failures, a cracked airline, a failed check valve on the air pump, escalate into larger problems when they go unnoticed.
Weigh the axolotl. Place the axolotl in a pre-weighed container of tank water on a kitchen scale, then subtract the container weight. This technique lets you track body condition without direct handling. A healthy adult axolotl typically weighs 60 to 225 grams depending on age, sex, and morph. Sudden weight loss of more than 10 percent in a single month, or rapid gain, may indicate illness, overfeeding, or reproductive changes. The obesity guide covers body condition scoring and diet adjustments.
Full substrate cleaning. For tanks with fine sand substrate, use a gravel vacuum to gently disturb and siphon the top layer, removing trapped detritus. Bare-bottom tanks should already be clean from daily spot-cleaning, but a monthly pass with a larger siphon catches anything the turkey baster missed. For deep sand beds, work in sections over multiple months to avoid releasing trapped gas pockets all at once.
Review the care log. Look at the past month’s daily and weekly entries. Identify any trends: Is temperature creeping upward as the season changes? Are nitrate readings trending higher, suggesting the water change schedule needs adjustment? Has the axolotl’s feeding response changed? Trend analysis over 30 days reveals patterns that single-day readings miss. A one-time high nitrate reading is a data point; three consecutive weeks of rising nitrate is a signal.
During summer months or heat waves, elevate temperature checks to twice daily, morning and afternoon, if your room lacks reliable climate control. Axolotls eat less in warmer water and may refuse food entirely above 72 degrees Fahrenheit. That is a normal physiological response to thermal stress, not a standalone health emergency, but it is a flag to address the temperature first before diagnosing appetite problems.
Quarterly protocol: full system audit
Quarterly axolotl care happens every three months and covers four tasks: a full equipment audit, refreshing dechlorinator and expired test kit reagents, assessing tank infrastructure for leaks and seal failures, and updating the written SOP to match any changes in setup or stocking. Calendar reminders prevent these long-interval tasks from being forgotten.
Full equipment audit. Inspect every piece of equipment in and around the tank:
- Filter: Is the motor running smoothly? Are O-rings and gaskets intact on canister filters? Is the impeller worn or cracked?
- Air pump: Is the diaphragm still producing adequate airflow? Most diaphragm air pumps need diaphragm replacement every 12 to 18 months; a quarterly check catches declining output before the pump fails completely.
- Thermometer: Compare against a known-accurate reference. Digital thermometers drift over time; an inaccurate reading can mask a dangerous temperature for weeks.
- Lighting: Confirm the timer is cycling correctly. Axolotls benefit from a consistent photoperiod of approximately 12 hours light and 12 hours dark, which mirrors natural day-night cycles in their native Mexico City habitat (source: Axolotl Planet). Consistent light cycles support circadian rhythm stability.
- Power strip and electrical connections: Check for moisture, corrosion, or damage near water. Confirm drip loops are intact on all cords running from the tank to the outlet.
Refresh dechlorinator and test kit supplies. Liquid test kit reagents expire. The API Master Kit has a shelf life of approximately three years from manufacture for most reagents, with nitrite and KH reagents lasting up to four years; accuracy can decline after a bottle has been opened and exposed to air for 12 or more months (source: The Aquarium Wiki). Check expiration dates and replace any reagent that is past its date or producing inconsistent results. Dechlorinator, Seachem Prime, API Tap Water Conditioner, or equivalent, also has a shelf life; replace if it has been open for more than two years or if the solution has changed color or consistency.
Assess tank infrastructure. Is the tank stand still level and stable? Has the silicone sealing on the tank developed any bubbles, gaps, or discoloration? Is condensation forming on the lid consistently, which is normal, or dripping excessively, which may indicate a seal or humidity problem? For tanks five or more years old, inspect seams closely. A slow leak is easier to address than a seal failure.
Review and update the written SOP. Has anything changed in your setup, a new filter, different substrate, a second axolotl? Update your protocol to reflect current equipment and stocking. If you have adjusted your water change frequency or volume based on parameter trends, document the new baseline so your care log and SOP stay synchronized.
Printable checklist summary
This condensed reference captures every task and frequency in one table. Print and post it near the tank, or save it digitally for quick reference.
| Frequency | Task | Time estimate | Pass criteria |
|---|---|---|---|
| Daily | Check water temperature | 1 min | 60-68 F (16-20 C); act if above 70 F |
| Daily | Remove uneaten food (15-20 min after feeding) | 2-3 min | No visible food remnants |
| Daily | Spot-clean waste with turkey baster | 2-3 min | No visible fecal matter |
| Daily | Observe gills, skin, appetite, movement, tail tip | 1-2 min | Normal gill posture, no lesions, responsive |
| Daily | Log anomalies | 1 min | Entry recorded if anything unusual |
| Weekly | 20-30% water change with dechlorinated, temp-matched water | 15-25 min | Replacement water within 2 F of tank |
| Weekly | Test ammonia, nitrite, nitrate, pH, GH, KH | 10-15 min | NH3=0, NO2=0, NO3 under 20, pH 6.5-8.0 |
| Weekly | Clean interior glass | 5 min | Clear viewing panels |
| Weekly | Inspect filter intake and output flow | 2 min | Expected flow rate confirmed |
| Weekly | Check equipment function | 2-3 min | All operating normally |
| Monthly | Deep-clean filter media in old tank water | 15-20 min | Media rinsed, not sterile; flow restored |
| Monthly | Test heater/chiller function under load | 5-10 min | Activates and deactivates at setpoint |
| Monthly | Inspect and replace worn equipment | 10 min | No cracked tubing, failed suction cups |
| Monthly | Weigh the axolotl | 5 min | Weight recorded; no more than 10% change |
| Monthly | Full substrate cleaning | 10-15 min | Detritus removed from substrate surface |
| Monthly | Review 30-day care log for trends | 5-10 min | No unaddressed parameter drift |
| Quarterly | Full equipment audit | 20-30 min | All components functional and accurate |
| Quarterly | Replace expired test kit reagents and dechlorinator | 5-10 min | All supplies within expiration date |
| Quarterly | Assess tank infrastructure | 10 min | No leaks, level stand, intact seals |
| Quarterly | Review and update written SOP | 10 min | Protocol matches current setup |
When the SOP flags a problem: escalation thresholds
Not every anomaly requires emergency action, but certain findings during routine SOP tasks should trigger immediate escalation rather than a “wait and see” approach.
Escalate to emergency protocol if:
- Ammonia or nitrite reads above 0 ppm on two consecutive tests despite a water change between them. This indicates a cycle crash, not a transient spike. Move the axolotl to a container of clean dechlorinated water and troubleshoot the tank separately. The beginner mistakes guide covers cycle crash causes.
- Temperature exceeds 72 degrees Fahrenheit and you cannot bring it below 70 degrees Fahrenheit within 2 hours. Move the axolotl to a cooler environment immediately. The heat spike emergency guide covers the first 60 minutes response.
- You observe cotton-like fungal growth on the gills, body, or limbs. Begin a salt bath protocol and isolate the animal. The fungus guide covers identification and safe treatment.
- Weight drops more than 10 percent in a single month with no change in feeding. Consult an exotic veterinarian.
Escalate to a vet visit if:
- The axolotl refuses food for more than 10 consecutive days with normal water parameters and temperature.
- Visible lesions, ulcers, or hemorrhagic spots do not improve after 48 hours of clean water and parameter correction.
- The axolotl shows persistent floating, listing, or inability to maintain a normal resting posture.
The health red flags guide provides a full decision tree for determining when home intervention is insufficient and when veterinary care is required. To locate a qualified exotic-animal veterinarian experienced with amphibians, use the directory maintained by the Association of Reptile and Amphibian Veterinarians (source: ARAV Find a Vet directory).
Frequently asked questions
How long does the daily checklist actually take?
The full daily routine, temperature check, uneaten food removal, waste spot-cleaning, and behavioral observation, takes 5 to 10 minutes for a single-axolotl tank. Most of that time is observation. Keepers who integrate the check into an existing daily habit report it becomes automatic within two weeks. The time investment is minimal compared to the cost of treating a health problem that a missed observation would have caught early.
Can I skip the weekly water change if parameters test fine?
Testing fine on a single weekly check does not guarantee parameters will remain fine for another week. Nitrate accumulates continuously, and a single good reading can mask a rising trend. Consistent 20 to 30 percent weekly water changes also replenish trace minerals, maintain buffering capacity, and dilute dissolved organic compounds that test kits do not measure. Skipping water changes based on a single parameter snapshot is one of the most common maintenance shortcuts that eventually leads to chronic health issues.
What is the best way to weigh an axolotl without stressing it?
Use a clean, pre-weighed container filled with 2 to 3 inches of tank water. Gently guide the axolotl into the container using a soft net or your hands wet first to protect the slime coat. Place the container on a kitchen scale, record the total weight, then subtract the container-plus-water weight. The entire process takes under two minutes. Axolotls tolerate brief containment well when the water temperature and chemistry match their tank. Weigh at the same time of day, before feeding, for consistent measurements across months.
Do I need to keep a written log, or can I just observe?
A written log converts subjective observation into objective data you can compare over time. Memory is unreliable for detecting gradual changes in gill fullness, feeding response speed, or weight trends. When you consult a veterinarian about a health concern, a log with dated temperature readings, parameter results, feeding records, and behavioral notes provides clinical-grade information that accelerates diagnosis. Even a simple spreadsheet with date, temperature, ammonia, nitrite, nitrate, pH, feeding response, and notes is far more useful than unaided recall.
How do I adjust the SOP for multiple axolotls in one tank?
Co-housed pairs change the behavioral side of the SOP more than the chemistry side. Water change volume and testing cadence for a 40-gallon pair are covered in the Weekly section above; the rest is observational. During daily checks, watch for nipped gill tips, bitten limbs, and tail-end fraying, early signs of territorial conflict, especially between mismatched sizes. Feed from opposite tank ends so the smaller animal is not outcompeted. Monthly weigh-ins should track each animal individually, not as an average. Pairing rules and separation triggers are covered in the tank mates guide.
Should I adjust any tasks seasonally?
Yes. During summer months or heat waves, daily temperature checks become critical, and you may need to check twice daily if your room lacks climate control. The axolotl-as-pets decision guide covers what year-round temperature management actually requires. In winter, if your room temperature drops below 55 degrees Fahrenheit, monitor for lethargy that exceeds normal cool-temperature slowdown. Seasonal temperature shifts also affect feeding metabolism: axolotls eat less in warmer water and may slow their intake even at safe temperatures as ambient warmth approaches the upper limit of the safe range.
By the ExoPetGuides editorial team, reviewed by an exotic-animal veterinarian
Updated 2026-05-17
Primary sources: AxolotlCentral care guide, Axolotl.org captive requirements, Axolotl Planet cycling guide, ARAV practitioner directory
Disclaimer: This content is for educational purposes only and is not a substitute for professional veterinary advice. Always consult a qualified veterinarian, ideally an exotic-animal specialist, for any health concern about your pet. Care recommendations may vary based on species, individual animal, and local regulations.