Keeping a jumping spider enclosure clean is one of the simplest parts of spider husbandry, but neglecting it produces problems that are disproportionately dangerous for a small animal in a small space. Mold, bacteria, and decaying prey remains accumulate fast in a warm, humid micro-environment, and stagnant air becomes a breeding ground for mould and bacteria within days (source: Por Amor Art). An enclosure that goes uncleaned for weeks can develop mold colonies that compromise respiratory tissue, bacterial films that contaminate water droplets, and ammonia buildup from decomposing organic matter. The good news is that the routine is short: 5 to 10 minutes for spot-cleaning, 20 to 30 minutes for a full deep clean every 4 to 8 weeks. This guide walks through the cleaning schedule by setup type, a step-by-step spot-clean that does not stress the spider, the full deep-clean workflow, how to handle mold outbreaks, which products are safe and which are lethal, and how to cope with cleaning needs around a molting spider.
How often should you clean a jumping spider enclosure?
Spot-clean every 2 to 3 days, replace paper-towel substrate every 3 to 5 days, and do a full substrate replacement plus enclosure wipe-down every 4 to 8 weeks for standard non-bioactive setups. Bioactive enclosures with springtails and isopods extend that full-clean cycle to 3 to 6 months because the cleanup crew consumes organic waste continuously. Cadence depends on substrate type, ventilation, and feeding frequency.
Standard setups (coconut fiber or paper-towel substrate, no microfauna cleanup crew) need active human maintenance because nothing inside the enclosure is breaking down the waste stream. The interval ranges below cover the realistic cases we see across the keeper community.
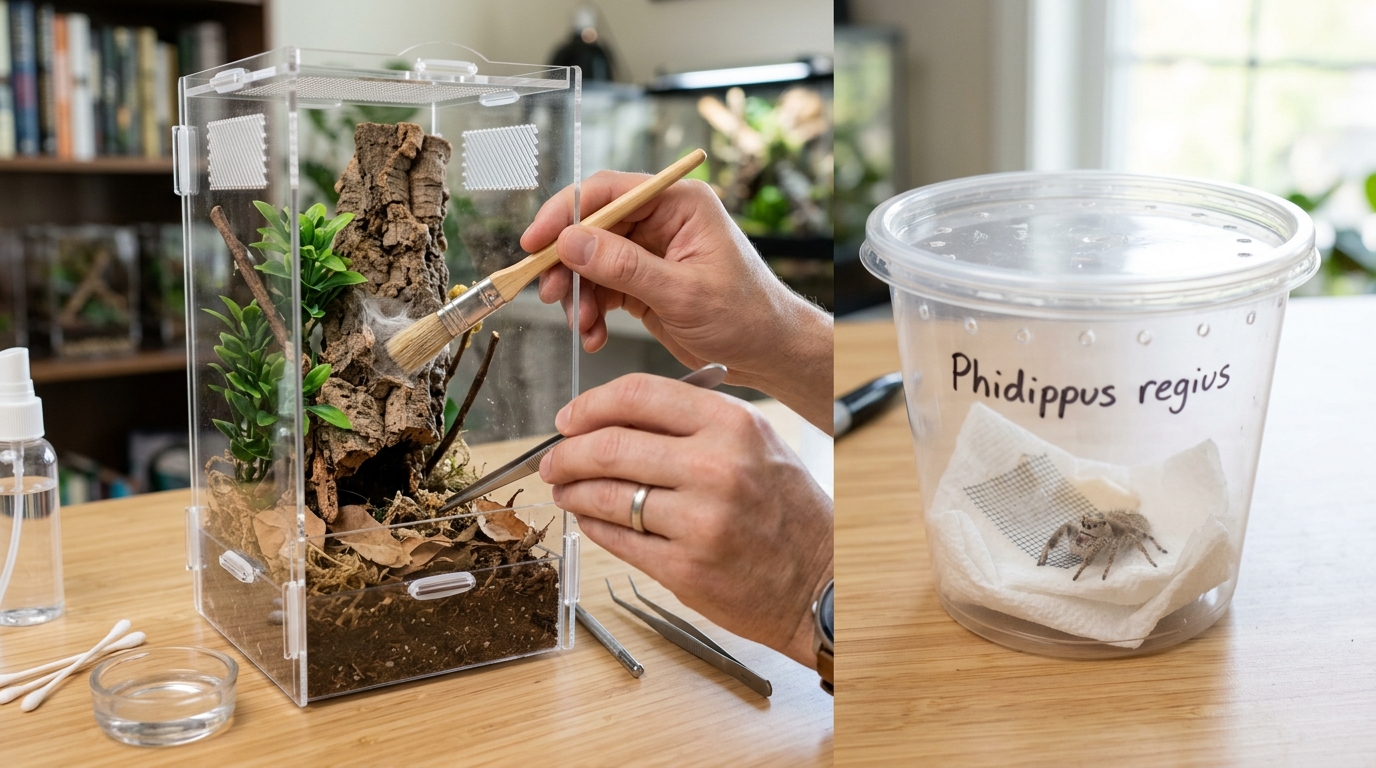
Spot-clean every 2 to 3 days. Remove visible boluses (silk-wrapped prey remains the spider discards after feeding), any uneaten prey items, and obvious droppings. Use soft-tipped tweezers or a small paintbrush to lift debris without disturbing the spider’s web hammock. Uneaten live prey should be removed within 24 hours of feeding, because crickets and other feeder insects can stress or even injure a resting or molting spider if left overnight.
Replace paper-towel substrate every 3 to 5 days. Paper towel shows contamination clearly. When it looks discolored, damp, or has visible mold spots, swap it out. This is the fastest substrate change in the rotation: lift the old sheet, wipe the enclosure floor with a damp paper towel, lay a fresh sheet.
Full substrate replacement and enclosure wipe-down every 4 to 8 weeks. Remove all substrate, wipe all interior surfaces, inspect ventilation openings for blockage, replace substrate, and rearrange decor. This is the deep clean described in detail below.
Bioactive enclosures need less frequent full cleans because the microfauna cleanup crew (typically springtails and dwarf isopods) consumes prey remains, droppings, dead leaves, and mold spores continuously (source: The Bio Dude). Spot-clean any large boluses the cleanup crew has not processed within 48 hours, and monitor for mold. A well-established bioactive system may run 3 to 6 months between any major intervention, or indefinitely if the microfauna population is healthy. The jumping spider substrate guide covers bioactive setup specifications including substrate depth, drainage layers, and microfauna stocking density.
Cleaning frequency by setup type
| Setup type | Spot-clean | Substrate change | Full deep clean |
|---|---|---|---|
| Paper-towel sterile setup | Every 2 to 3 days | Every 3 to 5 days | Every 4 to 6 weeks |
| Coco fiber, no cleanup crew | Every 2 to 3 days | Not needed between deep cleans | Every 4 to 8 weeks |
| Coco fiber with springtails only | Every 3 to 5 days | Top up quarterly | Every 2 to 4 months |
| Full bioactive (ABG mix + CUC + leaf litter) | Every 7 to 14 days, by exception only | Top up quarterly | Every 3 to 6 months or not at all |
Heavy feeders, hot rooms, and undersized ventilation shorten every interval in the table. A 4-inch by 4-inch by 7-inch enclosure in a 78F room running a Phidippus regius adult on three crickets per week will hit the upper bound of the bolus-accumulation curve faster than the same enclosure at 72F with two prey items per week. Adjust by observation, not by calendar alone.
How to do a routine spot-clean without stressing the spider
Spot-cleaning a jumping spider enclosure takes under 5 minutes when done correctly. Work slowly, use a soft brush or tweezers, target boluses and uneaten prey, leave the spider’s web hammock alone, and avoid sudden movements that trigger the predator-avoidance reflex. The goal is for the spider either to ignore you or retreat calmly, not to bolt or drop on a dragline.
Jumping spiders are visually oriented hunters with the sharpest vision of any arthropod for their body size. They notice fast movements at the edge of their visual field and respond by either freezing, fleeing, or threat-posturing. A clumsy spot-clean produces all three. A patient one produces a spider that watches your tweezers from the wall and goes back to grooming when you close the lid.
- Open the enclosure slowly. If the spider is sitting on the door or lid, gently nudge it onto a wall with a soft brush before opening fully. Sudden lid lifts unbalance a spider clinging to the door and risk a fall.
- Use long, thin tweezers or a small paintbrush. Pick up boluses and debris with deliberate, predictable motions. Quick jabbing triggers the spider’s predator-avoidance reflex and you lose the calm working window.
- Work around the web hammock. If the spider is in its retreat, do not disassemble or remove the hammock during a spot-clean. The hammock is the spider’s shelter and sleep site, and destroying it repeatedly causes chronic stress.
- Check the water droplets. If the misted corner has dried out, refresh a few droplets on the wall for drinking. Avoid spraying directly above or onto the spider.
- Close the enclosure gently. Lower the lid slowly. A sharp closing motion can spook the spider and undo five minutes of calm.
If the spider shows agitation (front legs raised in threat posture, rapid pacing, repeated jumping away from the tweezers), stop and try again in a few hours. Spot-cleaning does not need to happen at a specific time. It can wait until the spider is calm. Forcing a clean while the spider is in defensive mode burns trust you spent weeks building. For the full body-language guide that helps you read whether the spider is approachable today, see the jumping spider behavior guide.
In our keeper community, the most experienced handlers we work with run their spot-cleans at the same time each day, usually the spider’s quietest hour, so the routine becomes predictable to the spider. After two or three weeks, most adults will sit on the wall and watch the cleaning rather than flee. That predictability is welfare, not just convenience.
How to do a full deep clean of a jumping spider enclosure
A deep clean replaces all substrate, wipes every interior surface, clears ventilation openings, and gives you the chance to inspect the enclosure for cracks, damaged mesh, or structural issues. Plan 20 to 30 minutes, schedule it every 4 to 8 weeks for standard non-bioactive setups, and never deep-clean a spider that is in pre-molt or post-molt rest.
Before you start, gather everything in one place: a clean temporary container, a soft size-2 paintbrush, paper towels, white vinegar diluted 50/50 with water in a small dish, fresh substrate, and a tray to hold decor while it dries. The biggest predictable failure mode of deep cleans is reaching for a tool mid-process and leaving the spider’s temporary container unsupervised on a busy table.
Step 1: Temporarily relocate the spider
Move the spider to a small, secure temporary container. A clean deli cup with a few ventilation pinholes works well. Gently guide the spider into the container using a soft paintbrush, or place the container opening in the spider’s path and let it walk in voluntarily. Never grab a jumping spider by the body. Their legs and abdomens are fragile, and grip injuries do not heal.
Cap the temporary container and set it in a safe, room-temperature location away from direct light, drafts, and pets. The spider will be fine for the 20 to 30 minutes the deep clean takes. The handling principles in our jumping spider handling guide apply here: slow movements, no squeezing, let the spider walk voluntarily, never lift it by a leg.
Step 2: Remove everything from the enclosure
Take out all substrate, decor (branches, plants, cork bark), and any remaining silk webbing. Old webbing comes off glass and acrylic with a damp paper towel. Remove webbing from decor by rinsing under lukewarm running water. Discard old substrate completely rather than sifting and reusing, because spores and bacteria are not visible.
Step 3: Clean all interior surfaces
Wipe the inside walls, floor, and lid of the enclosure with a paper towel dampened with plain warm water. For stubborn residue (dried droppings, mineral deposits from misting), a paper towel dampened with 50/50 white vinegar and water works effectively. Vinegar is safe for invertebrate enclosures as long as you rinse the surfaces thoroughly afterward and allow them to dry completely.
Do not use soap, detergent, bleach, or commercial glass cleaners inside the enclosure. Surfactant residues from soap persist on surfaces even after rinsing and are toxic to invertebrates. Bleach fumes linger and damage the leaflike lamellae of book-lung tissue, which is the structure spiders use to exchange gases between hemolymph and the surrounding air (source: Britannica). Commercial glass cleaners contain ammonia and fragrance chemicals that linger as residue on the substrate the spider will walk across.
Step 4: Clean decor and enrichment items
Rinse all decor items under warm running water. For porous items like cork bark that may harbor mold spores, soak them in hot water (not boiling) for 10 minutes, then air-dry completely before returning them to the enclosure. Artificial plants can be rinsed and wiped dry on the same cycle.
Live plants in bioactive setups generally stay in the enclosure during cleaning. If a live plant has visible mold on its leaves or soil, remove it, clean the pot, replace the affected soil, and return it. Do not use soap or insecticidal soap on plants in a spider enclosure even after rinsing.
Step 5: Replace substrate and reassemble
Add fresh substrate to the enclosure floor. If using coconut fiber, hydrate a compressed brick in dechlorinated warm water until it expands fully (15 to 30 minutes), squeeze it to wrung-out-sponge dampness, and lay a half-inch to one-inch layer on the floor. Arrange decor to provide climbing surfaces and at least one sheltered spot near the top of the enclosure where the spider can rebuild its web hammock. Verify ventilation openings are clear and unblocked before closing the lid.
Step 6: Return the spider
Open the temporary container inside the enclosure and let the spider walk out at its own pace. Most jumping spiders begin exploring the freshly cleaned enclosure immediately. The spider will rebuild its web hammock within 24 hours, usually in the same approximate location as the previous one. If the spider freezes for an extended period or shows persistent agitation, dim the room lights and check back in an hour.
How to deal with mold in a jumping spider enclosure
Mold is the most common cleaning-related problem in jumping spider enclosures. It appears as fuzzy white, green, or gray patches on substrate, decor, uneaten prey, or boluses. Address visible mold within 24 to 48 hours: remove the affected material, replace surrounding substrate, increase ventilation, and monitor for recurrence. Widespread mold (more than a quarter of the substrate surface) calls for a full deep clean.
Mold thrives in warm, humid, poorly ventilated environments with organic food sources, which describes the conditions inside many small spider enclosures. The triggers we see most often are overmisting, sealed enclosures with insufficient cross-ventilation, and uneaten feeders left in the cup for more than 24 hours. Fix the trigger or the mold returns whatever you scrub.
Why mold is dangerous for jumping spiders
Jumping spiders breathe through a bimodal system of paired book lungs on the underside of the abdomen plus an internal tracheal network. Book lungs exchange gases between hemolymph in leaflike lamellae and the surrounding air (source: Britannica). Mold spores suspended in stagnant enclosure air pass directly across the book-lung surface. In a sealed or poorly ventilated enclosure, spore concentrations rise quickly and irritate or damage the respiratory tissue. Mold and fungal problems are a documented cause of decline in captive arachnids, with growths appearing on the carapace, underside of the abdomen, or the tips of the legs (source: Giant Spiders). Chronic exposure correlates with reduced activity, appetite loss, and shortened lifespan. For broader respiratory and dehydration symptoms that point to the same root cause (poor air quality), see our jumping spider health signs guide.
Immediate response to visible mold
- Remove the moldy item immediately. Whether it is a substrate patch, a decor piece, or a bolus, get it out of the enclosure within minutes of spotting it. Discard it; do not try to clean and reuse contaminated bark or moss.
- For localized mold, do a targeted excision. Remove the affected substrate in a roughly one-inch radius around the visible mold, replace with fresh substrate, and monitor for recurrence over the next 48 to 72 hours.
- For widespread mold, do a full deep clean. Multiple patches or any growth covering more than a quarter of the substrate surface signals systemic conditions. Run the deep clean above and audit the ventilation and misting habits that produced the outbreak.
Preventing mold long-term
Improve ventilation. Stagnant air is the single biggest contributor to mold growth in spider enclosures. Cross-flow ventilation (mesh or vent holes on at least two opposite sides, or a mesh lid combined with side vents) keeps humidity moving and dries surfaces between mistings (source: Por Amor Art). If the enclosure has only a mesh lid and no side ventilation, consider adding small vent holes on a lower side panel to create airflow from bottom to top. The jumping spider enclosure setup guide covers the cross-flow geometry that prevents mold by design.
Remove uneaten prey within 24 hours. Dead feeder insects decompose rapidly in warm, humid conditions and are a primary mold food source. A single moldy cricket carcass can seed an outbreak across a whole substrate.
Do not over-mist. Mist one corner or a section of wall rather than saturating the entire enclosure. The substrate should be slightly damp in one area, not wet throughout. The jumping spider temperature and humidity guide covers misting frequency and technique by species.
Remove boluses during spot-cleans. Silk-wrapped prey remains may look tidy, but the organic material inside continues to decompose and supports mold growth even when the silk wrap looks dry.
Consider a bioactive cleanup crew. Springtails (Folsomia candida) and dwarf white isopods (Trichorhina tomentosa) consume organic waste and outcompete mold for resources (source: The Bio Dude). For keepers fighting recurring mold outbreaks in a small enclosure, adding springtails is the lowest-cost first intervention before redesigning the ventilation.
What cleaning products are safe for jumping spider enclosures?
The safest cleaning agent for jumping spider enclosures is plain warm water; it handles the vast majority of routine cleaning needs. For tougher residue or mold response, diluted white vinegar (50/50 with water), 3 percent hydrogen peroxide, and properly diluted F10 SC veterinary disinfectant are all invertebrate-safe when rinsed thoroughly. Soap, bleach, ammonia-based cleaners, alcohol, and any insecticide are not safe at any dilution.
The safety question is not just about what kills the spider on contact. It is about residue. Invertebrate enclosures collect cleaning-product residue on every interior surface the spider walks across, and that residue absorbs through the cuticle and across the book-lung membranes during normal breathing. A product that is harmless on a kitchen counter can be lethal in a 32-ounce enclosure.
Safe products and how to use them
| Product | Use case | How to apply | Rinse needed |
|---|---|---|---|
| Plain warm water | Routine spot-cleans and deep-clean wipe-downs | Damp paper towel, wipe surfaces | No |
| White vinegar (50/50 dilution) | Mineral deposits, light organic residue, hard-water spots | Damp paper towel, wipe and let sit 1 minute | Yes, plain water rinse + air-dry |
| 3 percent hydrogen peroxide | Post-mold sterilization, bacterial cleanup after dead prey | Apply with paper towel, let sit 5 minutes | Yes, plain water rinse + air-dry fully |
| F10 SC veterinary disinfectant (manufacturer dilution) | Heavy sterilization after parasite or pathogen outbreak | Per manufacturer instructions (typically 1:250 to 1:500) | Yes, plain water rinse + air-dry fully |
White vinegar diluted 50/50 with water removes mineral deposits and light organic residue and is the workhorse for spot stains during deep cleans. Rinse surfaces thoroughly after use; the vinegar smell dissipates quickly once the enclosure is dry.
Hydrogen peroxide at 3 percent (standard drugstore concentration) can be used to sterilize surfaces after a mold outbreak. Apply with a paper towel, let sit for 5 minutes, rinse with plain water, and let the enclosure air-dry completely before adding substrate and returning the spider. Hydrogen peroxide kills most bacteria but is less effective against fully established mold colonies, which is why the prior excision step matters.
F10 SC veterinary disinfectant is a broad-spectrum disinfectant active against bacteria, viruses, fungi, and spores; it is widely used in exotic-animal veterinary practice and reptile keeping (source: Meadows Animal Healthcare). Follow the manufacturer’s dilution (typically 1:250 to 1:500 for terrariums and habitat furnishings), apply with a clean cloth or sprayer, and rinse thoroughly afterward even though the product label allows leave-on use in animal presence. For invertebrates, the rinse is a conservative choice given the cuticle absorption risk.
Products to avoid completely
- Soap, dish detergent, hand soap. Surfactant residues persist on surfaces even after rinsing and are toxic to invertebrates through cuticle absorption.
- Bleach (sodium hypochlorite). Fumes linger and damage book-lung tissue. Residue is not fully neutralized by rinsing.
- Ammonia-based cleaners (including most commercial glass cleaners). Ammonia irritates respiratory tissue at low concentrations.
- Alcohol-based cleaners (isopropanol, ethanol). Fumes irritate book lungs, and residue can absorb through the cuticle. Do not use rubbing alcohol inside the enclosure.
- Scented disinfectant sprays. Fragrance chemicals settle on surfaces and substrate and are not formulated for invertebrate contact.
- Insecticides, miticides, flea or tick sprays. Even residue from rooms recently treated for household pests is lethal to jumping spiders. Wash hands thoroughly before handling the spider if you have been in contact with any such product.
- Essential oils. Concentrated terpenes are toxic to invertebrates at very low doses; tea tree, eucalyptus, peppermint, and lavender oils are all banned.
The pattern is consistent: anything not specifically verified as safe for invertebrate use should be assumed unsafe. The keeper community’s general care references make the same call (source: Bugs in Cyberspace).
How to clean around a molting spider
Do not clean the enclosure while a jumping spider is in active molt or in the 48-hour post-molt rest window. The spider is immobile, the new exoskeleton is soft and fragile until it hardens, and any physical disturbance or environmental change risks injury or death. Postpone routine cleaning, leave the old exoskeleton in place for at least 24 hours after the molt appears complete, and resume the normal schedule only after the spider has fully recovered and resumed feeding.
A molting spider is at maximum vulnerability. During the molt itself, the spider sheds its old exoskeleton and the new one beneath is soft and fragile until it hardens over the next 24 to 48 hours (longer for sub-adults and adults than for early-instar slings). The spider cannot move, cannot defend itself, and cannot recover from physical contact. Even small environmental disturbances (a vibration from closing the lid hard, a sudden temperature change from opening the enclosure to a cool room) can interrupt the molt.
Do not clean the enclosure while the spider is actively molting. If you open the enclosure and see the spider lying on its side or back with legs extended and an old exoskeleton partially detached, close the enclosure immediately and leave it undisturbed for at least 48 hours.
Do not remove the old exoskeleton (exuviae) right away. Some spiders eat their shed exoskeleton to reclaim chitin and nutrients. Wait at least 24 hours after the molt appears complete before removing it during your next spot-clean. If the spider has not consumed it after 48 to 72 hours, gently lift it out with tweezers. The jumping spider molting guide covers the full pre-molt and post-molt timeline, including stuck-molt (dysecdysis) emergency response.
If a routine spot-clean is due and you suspect the spider may be in pre-molt (hiding in the hammock for extended periods, refusing food, abdomen appearing dark or dull), postpone the clean until the spider has molted and resumed normal activity. Pre-molt fasting can last anywhere from 5 days for an early-instar sling to 3 weeks for a mature adult. The jumping spider feeding schedule guide covers fasting duration by age and species so you can anticipate molting periods rather than be surprised by them.
For spiders that have shown signs of pre-molt within the last 5 to 7 days, hold any deep-clean plans for at least another 7 to 10 days after the molt completes. The new cuticle takes time to harden fully, and a deep clean disrupts the humidity and microenvironment the spider is using to recover.
Frequently asked questions
Can you use rubbing alcohol to clean a jumping spider enclosure?
No. Do not use rubbing alcohol (isopropanol) or any ethanol-based cleaner inside the enclosure. Alcohol fumes are irritating to book lungs, and residue on surfaces can absorb through the spider’s cuticle. Warm water handles most routine cleaning, and diluted white vinegar handles tougher residue. For sterilization after a mold or parasite event, 3 percent hydrogen peroxide or F10 SC veterinary disinfectant (rinsed thoroughly) is the safe choice, not alcohol.
How do you clean a jumping spider’s web hammock?
You do not clean the hammock. The spider builds and maintains it as its retreat and sleep site. During a deep clean, the old webbing is removed along with everything else, and the spider rebuilds within roughly 24 hours of returning to the fresh enclosure. Between deep cleans, leave the hammock intact. Repeatedly disassembling the retreat causes chronic stress and disrupts the spider’s normal day-night rhythm.
Is it normal for the enclosure to smell?
No. A well-maintained jumping spider enclosure should have no noticeable odor. A musty or sour smell indicates mold growth, decomposing prey remains, or overly wet substrate. Investigate immediately: lift decor to check undersides, look for moldy boluses tucked behind cork bark, check whether the substrate has been over-misted into a soggy mat. The enclosure is small enough that problems escalate within days rather than weeks.
Can you use a spray bottle to rinse the enclosure during cleaning?
Yes, a spray bottle works well for rinsing surfaces after applying vinegar or hydrogen peroxide during a deep clean. Use plain dechlorinated water in the spray bottle. Spray, wipe with a paper towel, and avoid leaving pools of water to drip-dry. Let the enclosure air-dry for 10 to 15 minutes with the door open before adding fresh substrate and returning the spider.
What should you do if mold appears on the spider itself?
Mold or fungal growth on the spider’s cuticle (white or yellow fuzzy patches on the body, legs, or around the book-lung openings) is a medical emergency. Move the spider to a clean temporary enclosure with paper-towel substrate and dry ventilation, do a full deep-clean of the original enclosure including substrate replacement and 3 percent hydrogen peroxide sterilization, and audit ventilation and misting habits to identify the moisture source. Cuticle fungal infections in captive arachnids carry a poor prognosis even with intervention, but improving the environment immediately gives the spider the best available chance of recovery.
How do you clean an enclosure that previously housed a spider that died?
Strip the enclosure completely (substrate, decor, any silk webbing), sterilize all hard surfaces with 3 percent hydrogen peroxide or F10 SC at manufacturer dilution, rinse thoroughly with plain water, and air-dry fully before reuse. Discard any porous decor (cork bark, sphagnum moss, dried leaves) rather than trying to disinfect them; spores and bacteria persist in porous substrates even after surface treatment. The acrylic or glass enclosure itself can be safely reused after this process. Wait at least 48 hours after sterilization before introducing a new spider so that any residual cleaner has fully evaporated.
Can the spider stay in the enclosure during a spot-clean?
Yes. Routine spot-cleans are designed to happen with the spider in place. Work slowly, target boluses and uneaten prey, avoid the web hammock, and the spider will either watch from the wall or retreat calmly. Only the full deep clean (substrate replacement and surface wipe-down) requires moving the spider to a temporary container.
By the ExoPetGuides Team | Jumping Spider Husbandry
This article was researched and written by the ExoPetGuides editorial team with AI-assisted drafting. All husbandry parameters, mold-response steps, and cleaning-product safety calls were independently verified against arachnid respiratory physiology references, recognized husbandry authorities, and experienced keeper community sources. ExoPetGuides does not sell cleaning products, disinfectants, or spider supplies and has no affiliate relationship with any product, platform, or supplier named in this guide.
This guide provides general husbandry information for keepers maintaining captive jumping spider enclosures. It is not a substitute for professional veterinary advice. If a jumping spider in your care shows signs of respiratory distress, persistent fungal growth, or unexplained decline that does not resolve with environmental correction, consult a qualified exotic-animal veterinarian experienced with invertebrates.